One of the reasons I like macOS is that it is a Unix system. Thanks to this, it’s trivial to set up an SSH server to remotely access and administer the machine, which in turn has allowed me to have a nice and powerful desktop computer which I can also leverage when I’m on the go.
Moving to Windows full time, as I briefly touched upon in My story with Windows, required that I could do the same on this platform. I knew that Windows ships with an SSH server and that it works well with VSCode, but I am still much more comfortable developing my side projects on a Unix system. Windows has WSL, which had proven to be sufficient for my needs, but WSL is still a separate environment from Windows—and the distinction rears its ugly head when trying to remote into the machine.
So the questions were:
- Could I configure Windows so that incoming SSH connections went to WSL?
- Could VSCode leverage this connection to directly interact with WSL from my laptop when on-the-go?
- Could the SSH server inside WSL start at system boot time, without logging in first?
As it turns out, the answers are yes in all cases. The process is tricky though and depends on the WSL version in use, so you can take these as my lab notes set this whole ordeal up.
The goal configuration in this post is to have an SSH server on port 2022 to reach WSL and to have it readily available when the machine boots (because reboots can unfortunately happen at any time “thanks to” forced OS updates).
A blog on operating systems, programming languages, testing, build systems, my own software projects and even personal productivity. Specifics include FreeBSD, Linux, Rust, Bazel and EndBASIC.
![]()
![]()
![]()
Common steps
The majority of the configuration process is common between WSL 1 and WSL 2, so let’s do those common steps first. Let’s start by configuring the SSH server within WSL:
Install WSL and a Linux distribution, and choose whether you want to use version 1 or 2. The instructions here are based on Debian.
Install the OpenSSH server inside WSL:
sudo apt install openssh-serverConfigure the port on which the OpenSSH server listens to 2022 and restart the service:
sudo sed -i -E 's,^#?Port.*$,Port 2022,' /etc/ssh/sshd_config
sudo service ssh restart
Allow your default WSL user to start the SSH server without typing a password:
sudo sh -c "echo '${USER} ALL=(root) NOPASSWD: /usr/sbin/service ssh start' >/etc/sudoers.d/service-ssh-start"Verify that the previous works; the command below should not ask for a password:
sudo /usr/sbin/service ssh start
After these steps, WSL should now be reachable from the Windows side via the local interface. Sanity-check that this is the case by running ssh -p 2022 localhost from a PowerShell console and seeing it work.
Next up, we have to configure the machine so that both WSL and SSH start at boot time. To do this, we will create a scheduled task on Windows to run a custom script that starts the two:
Create a placeholder script to start the SSH server within WSL. I keep this script as
%USERPROFILE%\sshd.bat(that is,sshd.batunder my home directory) but you can put it wherever you want:@echo off rem Contents depend on WSL 1 or 2; will be provided later.Copy and paste this task configuration into a file on your desktop. The name of the file does not matter; just make sure it carries an
.xmlextension:<?xml version="1.0" encoding="UTF-16"?> <Task version="1.2" xmlns="http://schemas.microsoft.com/windows/2004/02/mit/task"> <RegistrationInfo> <Date>2021-12-05T16:32:19.159532</Date> <Author>CHERRY\jmmv</Author> <URI>\Start WSL SSH</URI> </RegistrationInfo> <Triggers> <BootTrigger> <Enabled>true</Enabled> <Delay>PT30S</Delay> </BootTrigger> </Triggers> <Principals> <Principal id="Author"> <UserId>S-0-0-00-0000000000-0000000000-0000000000-0000</UserId> <LogonType>Password</LogonType> <RunLevel>LeastPrivilege</RunLevel> </Principal> </Principals> <Settings> <MultipleInstancesPolicy>IgnoreNew</MultipleInstancesPolicy> <DisallowStartIfOnBatteries>true</DisallowStartIfOnBatteries> <StopIfGoingOnBatteries>true</StopIfGoingOnBatteries> <AllowHardTerminate>true</AllowHardTerminate> <StartWhenAvailable>false</StartWhenAvailable> <RunOnlyIfNetworkAvailable>false</RunOnlyIfNetworkAvailable> <IdleSettings> <StopOnIdleEnd>true</StopOnIdleEnd> <RestartOnIdle>false</RestartOnIdle> </IdleSettings> <AllowStartOnDemand>true</AllowStartOnDemand> <Enabled>true</Enabled> <Hidden>false</Hidden> <RunOnlyIfIdle>false</RunOnlyIfIdle> <WakeToRun>false</WakeToRun> <ExecutionTimeLimit>PT72H</ExecutionTimeLimit> <Priority>7</Priority> </Settings> <Actions Context="Author"> <Exec> <Command>C:\Users\youruser\sshd.bat</Command> </Exec> </Actions> </Task>WARNING: Beware that this task definition relies on machine- and user-specific properties, and that I wiped them in the file above. In particular,
UserIdandCommandare wrong for your machine. That’s OK. Proceed with these fake values during the initial import.Open the Task scheduler tool from the Start menu.
Click on the Import Task… action and select the XML file you created.
Now edit the task to update the few settings that are machine- and user-dependent.
In the General tab, click on Change User or Group… and fix the name of the Windows user that will launch WSL:
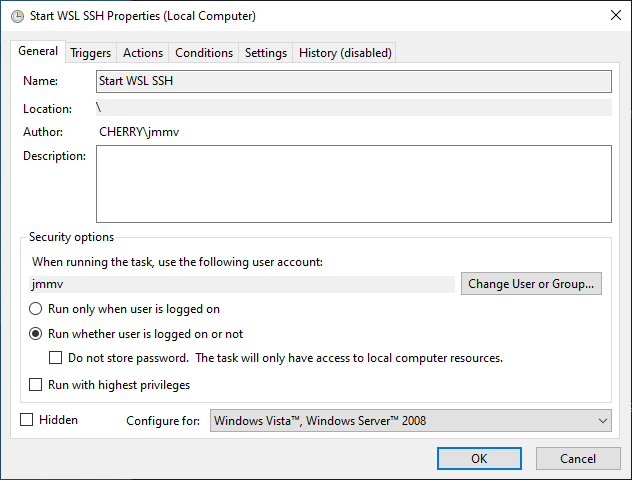
Screenshot of the General tab contents in the task configuration. In the Triggers tab, you should not have to change anything. Just make sure the trigger is registered as At startup:
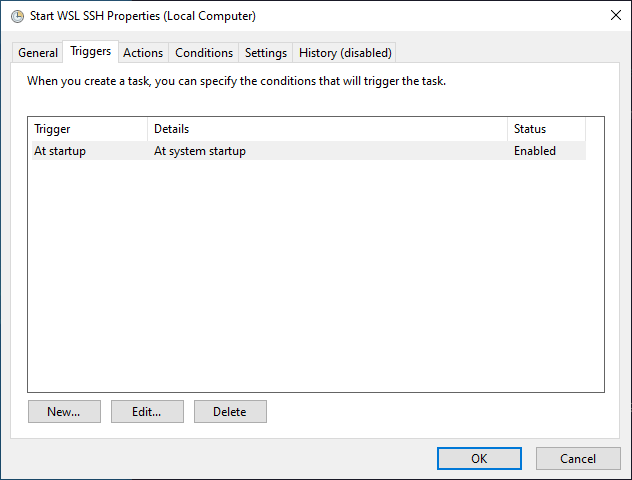
Screenshot of the Triggers tab contents in the task configuration. In the Actions tab, fix the path in the Start a program action so that it points to the
sshd.batscript you created: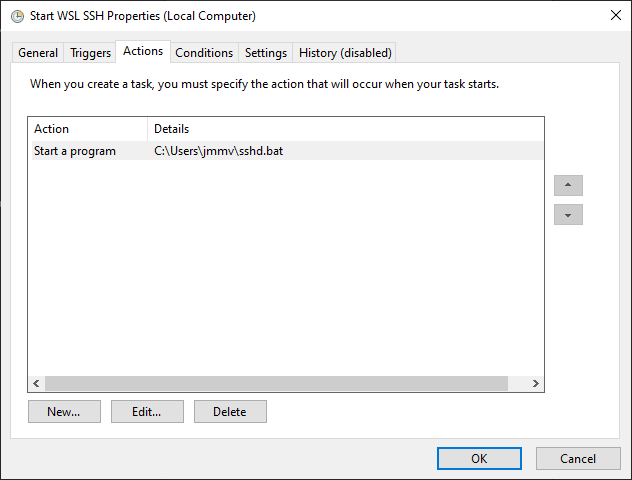
Screenshot of the Actions tab contents in the task configuration.
With these steps done, the task is now ready to run at system startup time even if you don’t log into your account.
It’s time to populate the sshd.bat script with the actual logic to run WSL and SSH. Its contents vary depending on WSL 1 and WSL 2 because they are vastly different beasts network-wise. You may want to review my post titled Windows Subsystem for Linux: The lost potential for details on this topic—and yes, I still believe WSL 1 is a better model.
WSL 1-specific steps
WSL 1 shares the kernel facilities with Windows so the network interface we see within WSL 1 is the physical network interface of the machine. As a result, the SSH server that is listening on port 2022 within WSL is actually listening on port 2022 of the physical interface. There is nothing extra to do to make this port reachable to outside connections. All we need is to make sshd.bat launch the SSH service.
Update the %USERPROFILE%\sshd.bat script as follows:
@echo off
C:\Windows\System32\bash.exe -c "sudo /usr/sbin/service ssh start"
WSL 2-specific steps
WSL 2 is a well-hidden virtual machine, but it is still a virtual machine—and the consequences of this design are leaky. The network interface we see within WSL is a virtual interface that does not match the physical interface that Windows manages. Windows does a good job at hiding this fact when operating directly on the local machine (e.g. you can SSH into WSL from localhost and it will work), but attempts to reach WSL from a separate machine will fail.
To fix this, we need to do a couple of things. First, we have to open up a firewall rule to allow incoming traffic on port 2022. Easy enough with PowerShell:
New-NetFirewallRule -Name sshd -DisplayName 'OpenSSH Server (sshd) for WSL' -Enabled True -Direction Inbound -Protocol TCP -Action Allow -LocalPort 2022
And then we have to route incoming traffic on the physical interface to the WSL interface via a “port proxy” rule. This is made extra complicated because the IP given to the WSL instance is not stable over time, so we need to figure that out dynamically.
Update the %USERPROFILE%\sshd.bat script as follows:
@echo off
setlocal

C:\Windows\System32\bash.exe -c "sudo /usr/sbin/service ssh start"

C:\Windows\System32\netsh.exe interface portproxy delete v4tov4 listenport=2022 listenaddress=0.0.0.0 protocol=tcp

for /f %%i in ('wsl hostname -I') do set IP=%%i
C:\Windows\System32\netsh.exe interface portproxy add v4tov4 listenport=2022 listenaddress=0.0.0.0 connectport=2022 connectaddress=%IP%

endlocal
Client configuration
That’s it. If everything went well, WSL should now be reachable via port 2022 from other machines. And if you also enabled Windows’ own SSH server—which you should probably do to have a fallback if the hand-crafted WSL setup fails—you should be able to reach Windows via port 22.
Combine that with a few entries in %USERPROFILE%\.ssh\config and ~/.ssh/config to trivially reach each system by name and you can then remote into each variant of the system with ease:
Host cherry cherry.meroh.net
Hostname cherry.meroh.net
Port 2022
User jmmv

Host cherry-win cherry.meroh.net
Hostname cherry.meroh.net
Port 22
User jmmv

Host cherry-wsl cherry.meroh.net
Hostname cherry.meroh.net
Port 2022
User jmmv
The above is especially useful if you use VSCode’s Remote SSH extension as you will now be able to pick the target system from the dropdown menu.

