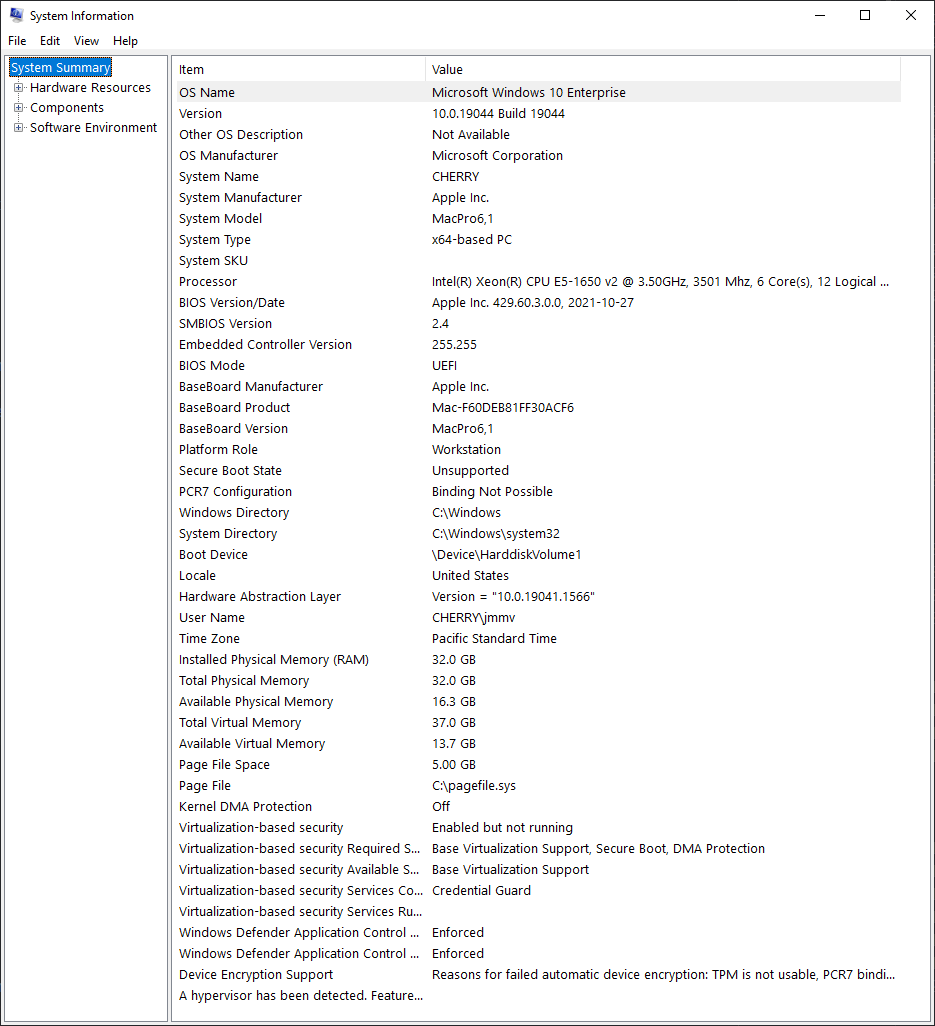
The Mac Pro 2013 is the most powerful machine I have at home. Equipped with a 6-core Intel Xeon E5-1650 v2 @ 3.5GHz, 32GB of RAM, dual AMD FirePro D500 graphics cards, and a 512GB SSD, it’s not a fast machine by today’s standards—but it’s still pretty decent. I love the hardware looks, its small form factor and its quietness, plus it is still fast enough for my needs; I have no good reasons to replace it. Except… I have slowly drifted away from macOS towards Windows and this has put the machine’s future at risk.
Last summer I realized that I was primarily using Windows on a less-powerful Dell OptiPlex 9020 and only occasionally used the Mac Pro for my personal projects—and even when I did, I used the Mac Pro mostly via VSCode’s remote SSH extension. I didn’t like having the machine sit unused, so I decided it was time to fix the situation by installing Windows 10 on a separate partition. That happened over 8 months ago and my experience so far has been positive. I have had to fight various issues like random reboots and poor graphics drivers though.
But then… I recently started running out of disk space on the Windows partition. It turns out that games like Black Mesa, which I just bought during the Xmas sale, require lots of space, duh. And this situation was starting to become problematic. It was time to repartition the drive and, noticing how I had not touched macOS at all for months… it was time to do the unthinkable: to kiss goodbye to macOS altogether.
A blog on operating systems, programming languages, testing, build systems, my own software projects and even personal productivity. Specifics include FreeBSD, Linux, Rust, Bazel and EndBASIC.
![]()
![]()
![]()
So, this past weekend, and armed with a ton of patience, I decided to wipe the internal SSD drive and install Windows 10 from scratch. Given that the process is tricky, I have written down the various steps that are required to reach a fully-functional system. Some of these steps are only necessary if you want to wipe the drive and go for a Windows-only system, which is what I wanted to do, but you can proceed with a Boot Camp-supported installation as well.
Here is what we’ll go through:
Preparing for a clean install
To prepare the internal SSD for a clean installation of Windows 10, you should take some precautionary steps before wiping the drive. These include having the necessary drivers at hand, and ensuring we have a way back to macOS in case something goes wrong.
Preserving BootCamp drivers
Before removing macOS, get a copy of the Boot Camp drivers that will be necessary to set up Windows. In researching how to do this post-facto for this post, it seems like you can download these directly from Apple, but why risk it.
Open Boot Camp Assistant and select the Download Windows Support Software option from the Actions menu. Before closing the assistant, search for an image named WindowsSupport.dmg somewhere under /Library:
find /Library -name "*Windows*Support*dmg"
My notes say that the file is under /Library/Application Support/Bootcamp but the location might vary. Find that file, open it to mount the disk image, and then copy and save its full contents in a safe place for future use.
Preserving macOS
While macOS is not necessary for the Mac Pro 2013 to operate, it is still required for some operations: namely for firmware upgrades, which are only distributed via macOS. Because of this, losing this OS seems like a risky proposition: (security) firmware upgrades, albeit rare for this 9-year old machine, could still be required.
Fortunately, macOS can be installed on a USB drive and booted from it, so that’s an option to keep a usable copy without consuming any space on the internal drive. Do that installation now.
It is also good to verify that macOS’s Internet Recovery features work fine by booting the machine while pressing Command+Alt+R. This is the ultimate fallback option in case of total internal SSD failure, so make sure that this works.
Wiping the drive
The scary step. Boot into macOS’ Internet Recovery, open the Terminal from the Utilities menu, and do something like this. DATA LOSS IS GUARANTEED.
diskutil unmountDisk disk0
dd if=/dev/zero of=/dev/disk0 bs=8m
I was a bit concerned about losing the EFI boot partition with this step. I knew reinstalling macOS would restore the partition just fine based on previous experience, but I wasn’t sure if Windows would work on Apple’s hardware if Windows itself was the one creating the partition. As it turns out, Windows works just fine and, in the end, this decision turned out to be the correct one as we will see in the section that talks about rEFInd.
Installing drivers
If you are installing Windows via the Boot Camp assistant, then all Apple-specific drivers will be automatically installed for you. But in this case here, where we have performed a clean Windows install, it is up to us to install those drivers. And install them we must, because otherwise a lot of hardware does not work.
This is easy. Right after finishing the first boot, open up the files you previously extracted from the WindowsSupport.dng image. If you poke through the files you will notice that there are a ton of drivers that don’t apply to this machine; it was slightly tempting to skip them but, in the end, I didn’t want to risk forgetting anything so I just went with the default installer. Run the top-level setup.exe and allow the whole thing to install.
After doing this, Windows 10 should be ready to use. Mostly. You will be limited by ancient drivers and you will experience some brokenness.
Fixing issues
Once you reach this point, I’ll assume that you have completed a Windows installation via the Boot Camp assistant or via the clean installation instructions above. In either case, you will face the same set problems that need manual intervention.
Fixing virtualization
The first problem that we encounter is that virtualization does not work. This may or may not matter to you, but if you want to use WSL 2 at all, it does matter. See this:
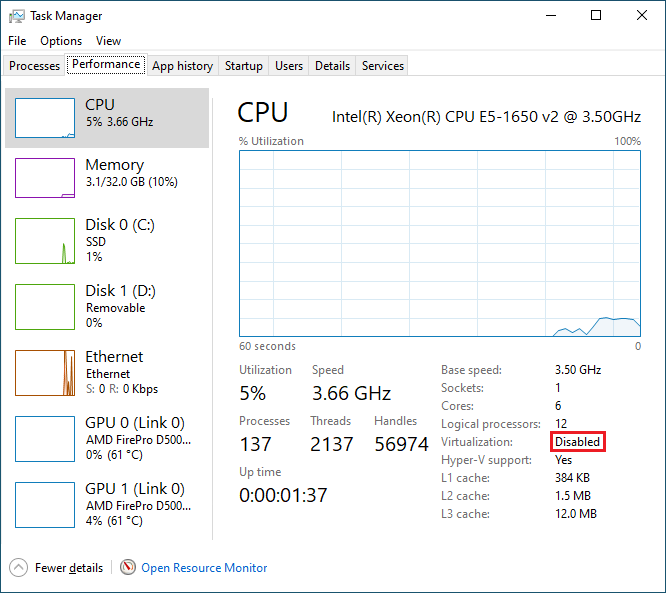
Sad. Why wouldn’t virtualization work when this CPU definitely has virtualization features?
As it turns out, there is a bug(?) in Apple’s firmware that’s at fault. Fortunately, it is possible to side-step the problem by using the rEFInd boot manager. Poking through its configuration file, we find the following setting:
# Enable VMX bit and lock the CPU MSR if unlocked.
# On some Intel Apple computers, the firmware does not lock the MSR 0x3A.
# The symptom on Windows is Hyper-V not working even if the CPU
# meets the minimum requirements (HW assisted virtualization and SLAT)
# DO NOT SET THIS EXCEPT ON INTEL CPUs THAT SUPPORT VMX! See
# http://www.thomas-krenn.com/en/wiki/Activating_the_Intel_VT_Virtualization_Feature
# for more on this subject.
# The default is false: Don't try to enable and lock the MSR.
#
#enable_and_lock_vmx false
… which we will want to leverage. So it’s time to install rEFInd.
If you are dual-booting macOS and Windows, you should perform the rEFInd installation from macOS, which in turn means having to boot into the recovery image to side-step SIP. I tried to get the installation to work from Windows but couldn’t, which is possibly due to Apple’s own EFI partition not playing well with what Windows’ tooling expects.
If you are installing Windows on its own, following the instructions to install rEFInd from Windows will work just fine. For reference, here is what bcdedit said before configuring rEFInd:
Windows Boot Manager
--------------------
identifier              {bootmgr}
device                  partition=R:
path                    \EFI\Microsoft\Boot\bootmgfw.efi
description             Windows Boot Manager
locale                  en-US
inherit                 {globalsettings}
default                 {current}
resumeobject            {5fac18e6-96cf-11ec-b693-b2c1f730c2d0}
displayorder            {current}
toolsdisplayorder       {memdiag}
timeout                 30
And here is what bcdedit says after configuring rEFInd:
Windows Boot Manager
--------------------
identifier              {bootmgr}
device                  partition=R:
path                    \EFI\refind\refind_x64.efi
description             rEFInd Boot Manager
locale                  en-US
inherit                 {globalsettings}
default                 {current}
resumeobject            {5fac18e6-96cf-11ec-b693-b2c1f730c2d0}
displayorder            {current}
toolsdisplayorder       {memdiag}
timeout                 30
Once rEFInd is installed, open the refind.conf file in the EFI partition, look for the enable_and_lock_vmx line, enable it, and set it to true.
If Windows is going to be your only system on this machine, you may also want to set timeout to -1 so that rEFInd does not even show up at boot time.
With these fixes in place, virtualization works like a charm:
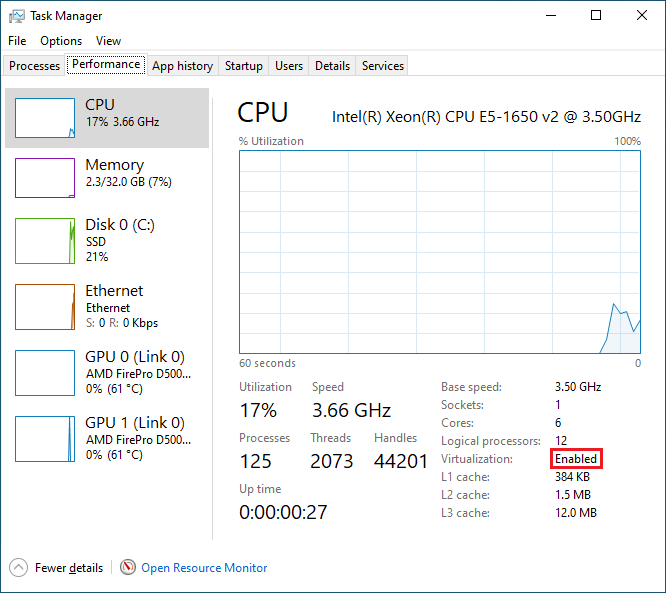
And, as a result, WSL 2 can be used without issues. Or can it?
Fixing spontaneous reboots
A very interesting annoying problem I faced were random hard reboots that left zero debugging traces behind. In the end, and by pure coincidence, I discovered what was causing the problem.
You see, I have two accounts on this machine: a personal account where I run WSL and an AAD-enrolled account where I do work stuff. If I started WSL on the personal account and then logged into the AAD-enrolled account without logging out of the personal account, the machine would spontaneously reboot after exactly 10 minutes. It took me a long time to notice that this sequence of events was deterministic, but once I figured that out, I could start hypothesizing what the problems could be.
At first I suspected virtualization issues so I downgraded my WSL installation to WSL 1, but the problems remained. Then I suspected driver problems but I didn’t know what to do about those without any other information to support this theory. There were zero events left in the Event viewer about the reboot and it was impossible to make the machine enter the kernel debugger when the problem arose. And then I noticed these optional updates under Windows Update:
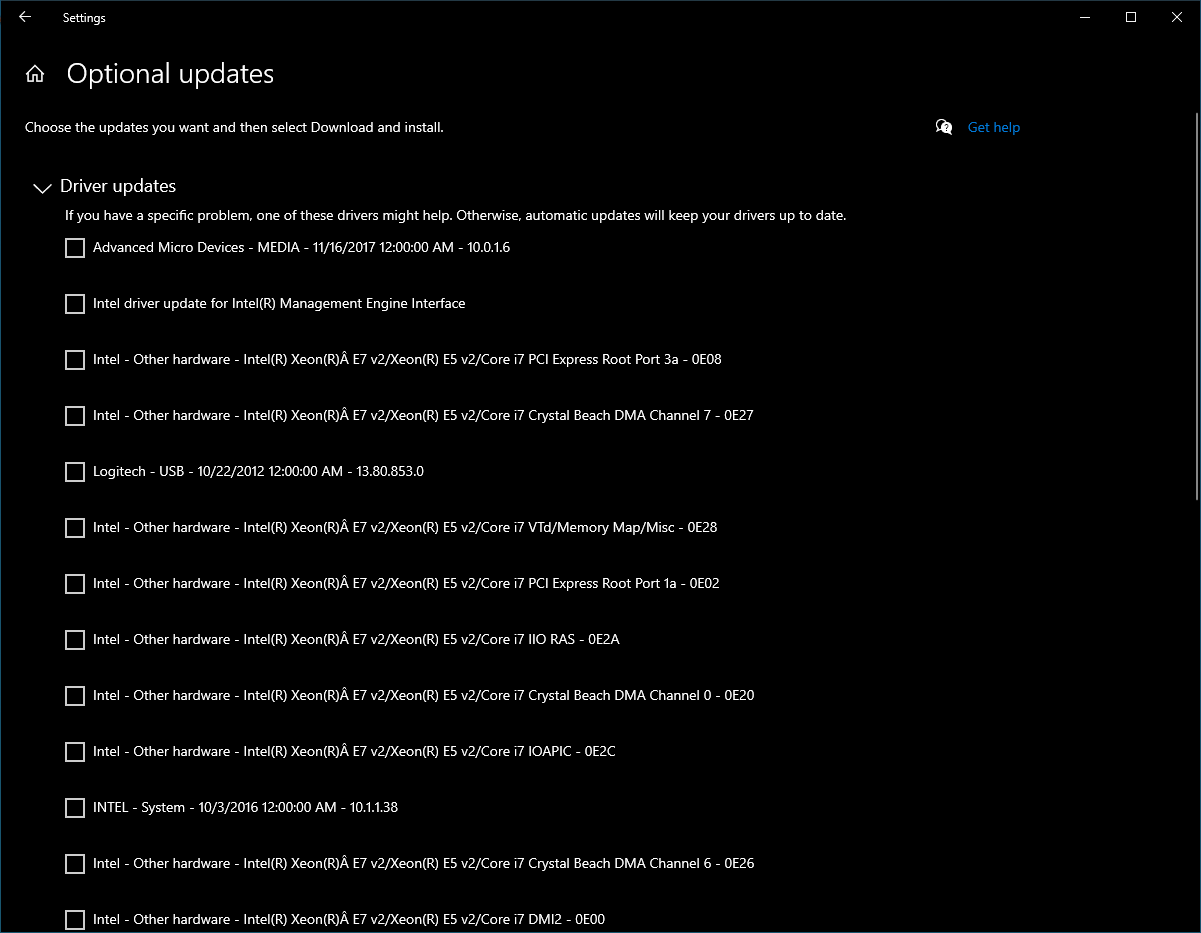
I imagined that these could be beneficial and might fix this problem… but knowing how picky Apple hardware can be and how Boot Camp ships with its own ancient drivers, I had avoided installing those. Unfortunately, the random reboots were quite a problem, so at some point, YOLO-style during a work day, I selected all of these optional updates and applied them.
And you know what? Problem solved.
Fixing modern games
The next problem came from the graphical drivers that ship with Boot Camp. Those drivers work fine but they are ancient. In particular, they lack Vulkan support. I am not a big gamer but wanted to try a couple of new games (like… a port of Quake II to Vulkan) and these were failing. So I wanted to see if I could get more modern drivers.
As it turns out, the official Radeon drivers from AMD work well—but they require some trickery to install. The file I downloaded is called unified_r5_20.45.40.10_whql_210630a-370106C.zip in case you want to double-check what you got. Save it in a safe place along with your copy of WindowsSupport.dmg because you never know when these working drivers may disappear from the vendors’ site.
Whenever you launch the installer, you are greeted with this error:
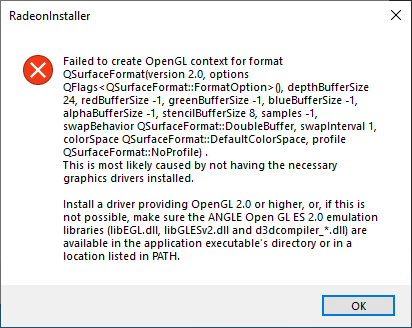
Yikes. The installer itself cannot launch because it requires some OpenGL features that the existing ancient driver doesn’t support.
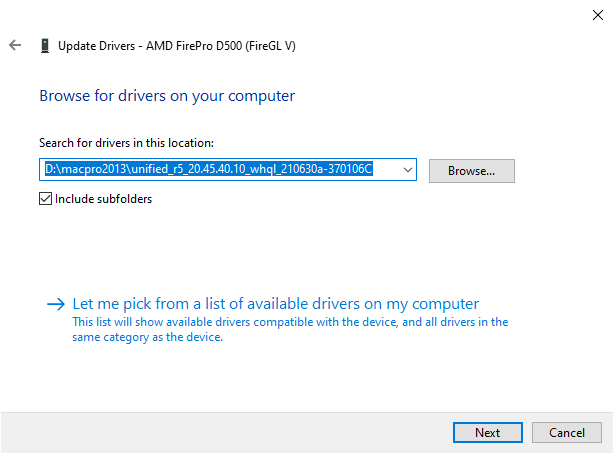
The trick here is to go into the Device manager, look for the FirePro card, right-click on it, and ask to install drivers by hand. Then pick the folder where you unpacked the downloaded drivers and let it do its job to upgrade them:
After the drivers are updated, we can proceed to do the full-blown AMD Radeon installation just fine:
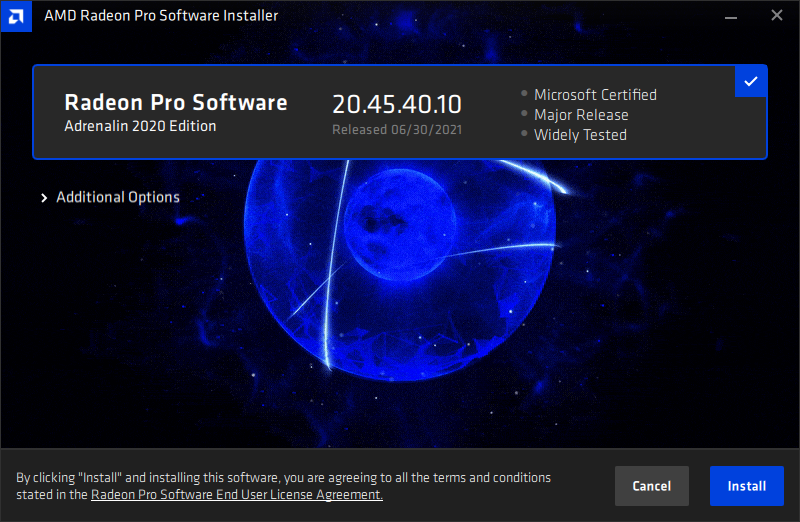
I suspect none of this extra support software crap is necessary, but at least the installer was useful to prune the old AMD Catalyst drivers, which were not removable from Add or remove programs, by selecting the Factory reset option.
Other topics
That’s about it! If you have followed all steps above, you should have a Windows 10-powered, rock-solid, Mac Pro 2013 workstation at your disposal:
There are a few more miscellaneous issues to talk about though.
Missing TPM
Apple hardware does not have a TPM chip—though modern models have the Secure Enclave, or T2 chip, which is “about the same but not really”.
The lack of TPM isn’t particularly a problem unless you want to run Windows 11, but it is slightly annoying. The main drawback is the inability to use the full-blown Windows Hello features, which are a very convenient and secure way to perform authentication, or the inability to use BitLocker without a USB flash drive to hold the boot keys.
24x7 availability
Even after all the extra driver upgrades, the Boot Camp support software leaves some traces behind—like its own control panel. I was pondering if I could remove it, but then I found that it includes support for one important setting: the ability to tell the machine to automatically restart on power failure:
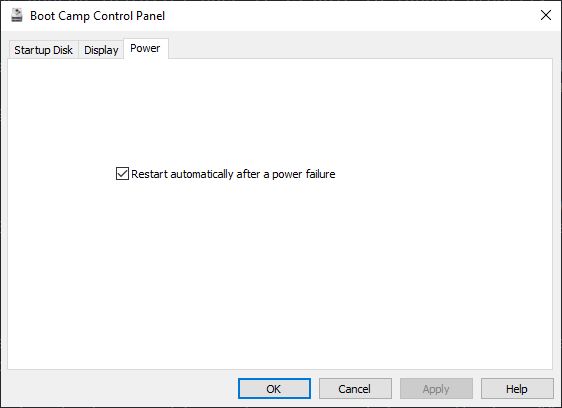
If you are going to want to access the machine remotely, like I want to do, then toggling this setting is important. Don’t forget to go into Windows’ native Power & sleep settings to prevent the machine from going to sleep as well.
Screen glitches no more
One of the reasons I had also stopped using the Mac Pro before this whole ordeal was that I experienced some annoying glitches on my Dell UltraSharp 27 monitor (4k @ 60Hz via DisplayPort). Pretty much at random, I would notice what looked like electromagnetic interference on the top-right of the screen, and it was very distracting. I tried replacing cables to no avail. Given that I could not see this happening with the work-issued Mac Pro (exact same model) that I had at home “thanks to” the pandemic, I concluded that my precious Mac had hardware issues at these higher resolutions.
But, somehow, I have never noticed this glitch when running Windows on this Mac and, in fact, I had even forgotten about it. Until last week when I booted into macOS to prepare for the full reinstall described here and saw the problem happen immediately. Maybe this is not a hardware problem after all, or maybe the Windows drivers are doing something to side-step it (like favoring the other GPU as primary?). Don’t know; don’t care.
What about Windows 11?
Yes, what about it? I did try to get it to run using all the registry hacks you can find on the Internet, using Rufus to patch an installation ISO, and what have you… but none have worked. So, for now, Windows 10 it is. Windows 11 is fine from what I have seen on my Surface devices, but it’s really not that different.
I guess that by 2025, when support for Windows 10 drops, it’ll really be time to upgrade the hardware. I wonder if at that point Apple itself will still support this old machine—which had been a fear of mine as well.
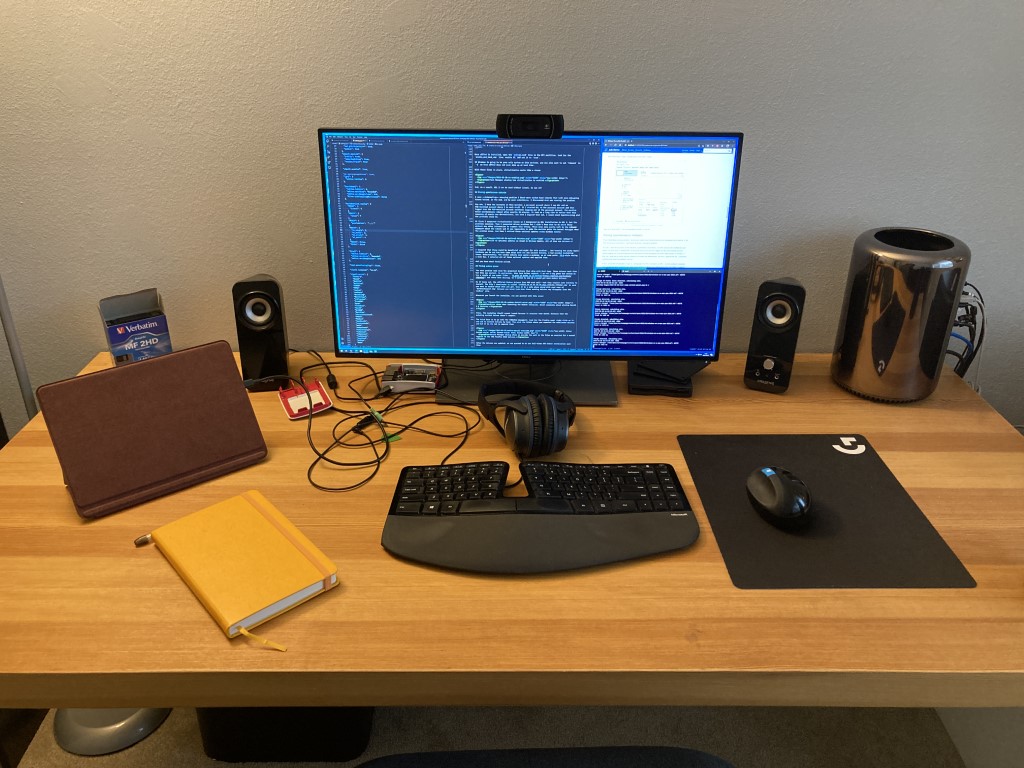
To conclude, here is what my setup currently looks like: