
Since the last article on the text-based IDEs of old, I’ve been meaning to write about the GCC port to DOS, namely DJGPP. As I worked on the draft for that topic, I realized that there is a ton of ground to cover to set the stage so I took most of the content on memory management out and wrote this separate post.
This article is a deep dive on how DOS had to pull out tricks to maximize the use of the very limited 1 MB address space of the 8086. Those tricks could exist because of the features later introduced by the 80286 and the 80386, but these were just clutches to paper over the fact that DOS could not leverage the real improvements provided by protected mode.
This detour is long but I hope you’ll enjoy it as much as I enjoyed researching the topic. I’ll walk you through the changes in the x86 architecture over time, starting with the 8086 and ending in the 80386, and how DOS kept up along the way. I’ll conclude with a peek into DOS’ own MEM and MemMaker utilities. I must omit details to keep the text manageable in size though, so please excuse the lack of detail in some areas; just follow the links to external documentation to learn more.
A blog on operating systems, programming languages, testing, build systems, my own software projects and even personal productivity. Specifics include FreeBSD, Linux, Rust, Bazel and EndBASIC.
![]()
![]()
![]()
Before we begin, I’d like to thank neozeed from Virtually Fun for his in-depth review of this article. Head to his blog for a lot of interesting and related content!
The 8086 and real mode
Back in the 1980s, the Intel 8086 was the processor for PCs (along with its crippled sibling 8088 which I’ll ignore throughout this post). The 8086 was a simple chip with significant limitations, but it was incredibly successful and is the foundation of the x86 architecture that we still use today. Because the 8086 powered PCs, and DOS was the operating system that IBM chose for the PC, DOS was designed to work for the 8086.
For the purposes of our article, let’s focus on two details: the 8086 CPU had a 20-bit address bus, which means it could only address 1 MB of memory, and it was a 16-bit CPU, which means that its internal registers were all 16-bit long. Which begs the question: if registers could only represent 2^16 = 64K different values, how could code reference a 20-bit address space?
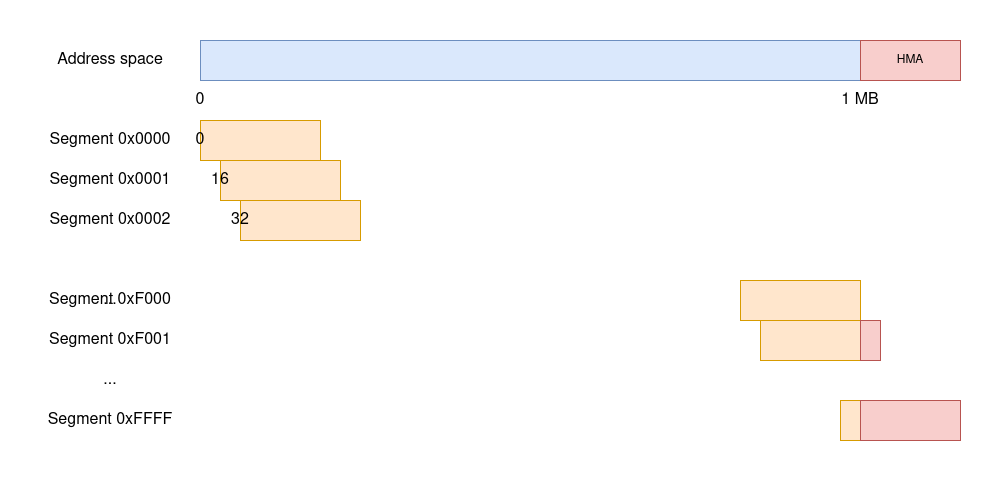
The answer is segmentation. In the 8086, every instruction that references memory does so by specifying an address as two separate 16-bit quantities: a segment and an offset within the segment. Because segments are 16-bit long, there can be up to 64KB segments—and if we take the 1 MB total address space and divide it by 64KB, we deduce that segments are offset from each other by 16 bytes.
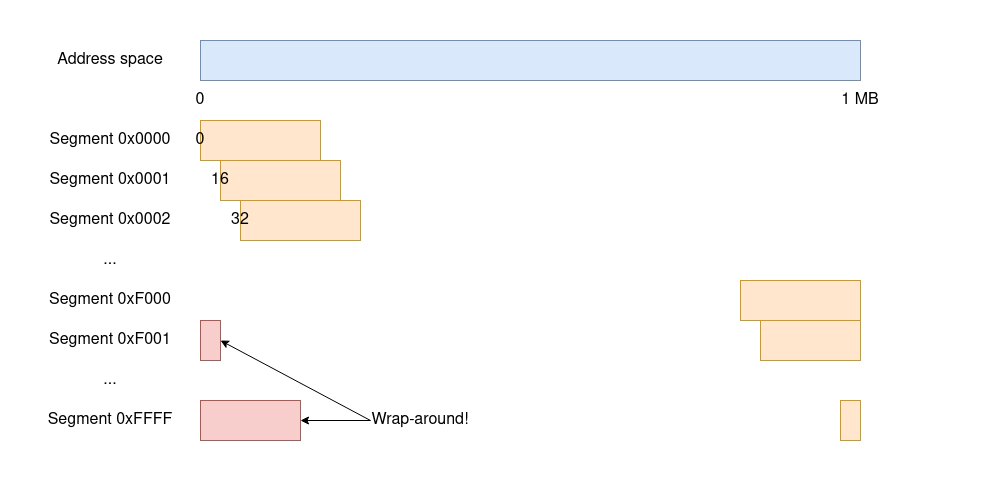
There are two things of note in the diagram. First, segments overlap, meaning that a single memory location can be referenced by many different segment/offset combinations. And, second, all segments after 0xF000 reference memory positions above the 1 MB address space that don’t exist, which the 8086 chose to wrap around by ignoring the 21st bit of an address. After all, there is no 21st line in the address bus.
When accessing a piece of memory with an address of the form segment:offset, say 81DA:72C3, the 8086 multiplies 0x81DA by 16 (a simple 4-bit shift to the left) and adds the 0x72C3 offset to the result to obtain address 0x89063. From there on, the 8086 reads from or writes to that memory location and calls it a day. There is no Memory Management Unit (MMU): every memory access can reference any address, and all accesses are legal (including those that wrap around!) which means null or dangling pointer dereferences don’t cause any sort of crash.
This type of MMU-less segmented addressing is known as real mode, but this name didn’t appear until the 80286 had to give it a name to distinguish it from protected mode. But before introducing the latter, let’s talk about memory maps for a second.
Conventional and upper memory
Just because the 8086 processor can reference 1 MB of memory does not mean that 8086 machines came equipped with 1 full MB of RAM. Machines typically included less than that for cost reasons, so it’s critical to understand that the address space—that is, the set of addresses that can be referenced—is different from the amount of memory installed. No surprise there: the same is true today of modern 64-bit CPUs.
This fact was advantageous because certain system devices prefer to expose themselves as part of the address space. For example: the BIOS ROM is accessible via a range of addresses in upper memory. Or another example: video cards tend to expose their framebuffer as a memory-mapped device so that applications can directly write to well-known addresses to manipulate video memory—bypassing the separate I/O bus and instruction set.
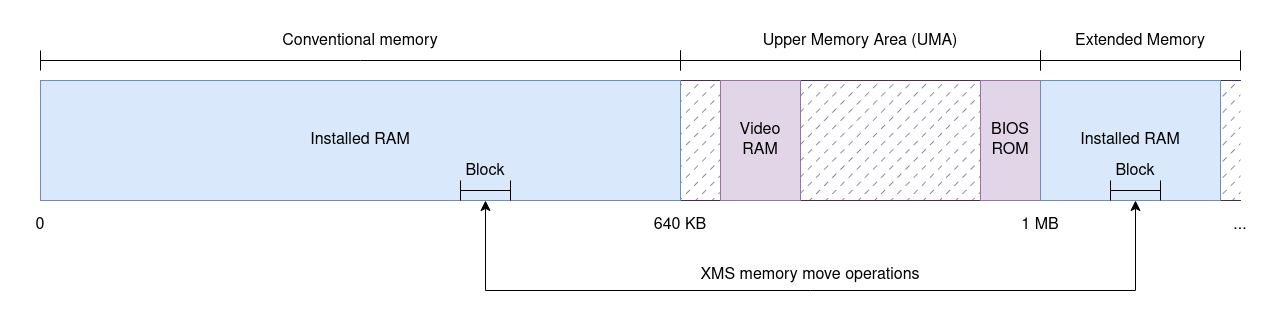
The question is: where do such devices live within the address space? The choice is pretty much arbitrary, so what IBM did was split the address space of the original PC in two parts. The first 640 KB, known as conventional memory, were mapped to available RAM and were readily usable by applications. The upper 384 KB, known as upper memory or the Upper Memory Area (UMA), were reserved for memory-mapped devices. This assignment of meaning to portions of the address space for specific purposes is what’s called a memory map, and this was the memory map of the original PC.
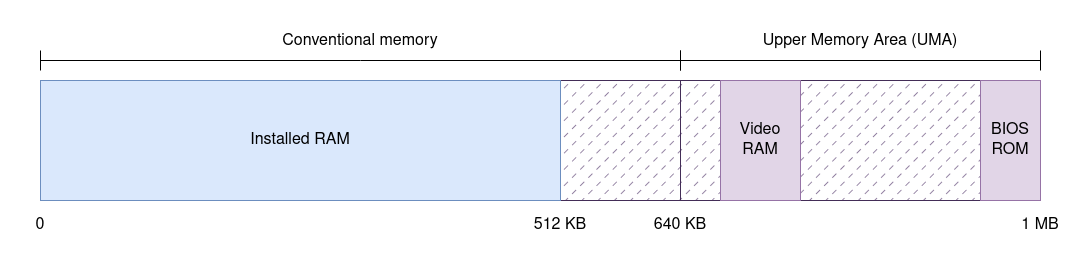
Note how conventional memory may not be fully usable: as shocking as it may sound today, PCs could have even less than 640 KB of installed RAM. More importantly for our purposes, the upper memory is sparse: certain address ranges are assigned to devices, but there may be gaps between devices. What happens when reading from or writing to unmapped addresses is hard to tell as this depends on the chipset—not the CPU—but remember that all accesses had to be valid in some form.
And by the way, there is one teeny tiny exception to the “all first 640 KB are free to use to applications”: the very first 1 KB of RAM is reserved for the Interrupt Vector Table, which is what the 8086 uses to look for interrupt handlers when it receives an interrupt, and a few more bytes after that are used by the BIOS to map volatile data. We can ignore these.
Expanded Memory Specification (EMS)
As you can imagine, 640 KB of RAM were soon not enough for many programs. Applications needed access to more memory, but the limitations of the 8086 20-bit address bus made it difficult. Yet there was a need for an immediate solution. The Expanded Memory Specification (EMS) was one of those first solutions and was originally designed by Lotus in order to support their star application 1-2-3.
The idea is simple. Remember how upper memory is sparse? What if we could map a window in that address space to a different portion of memory? And what if we could control, via software, which portion of memory was exposed through such window at any given time?
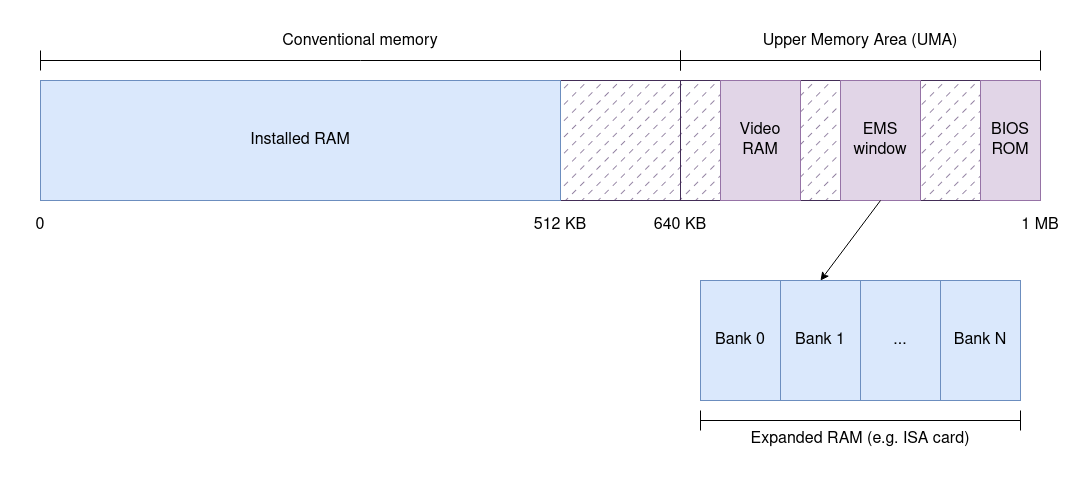
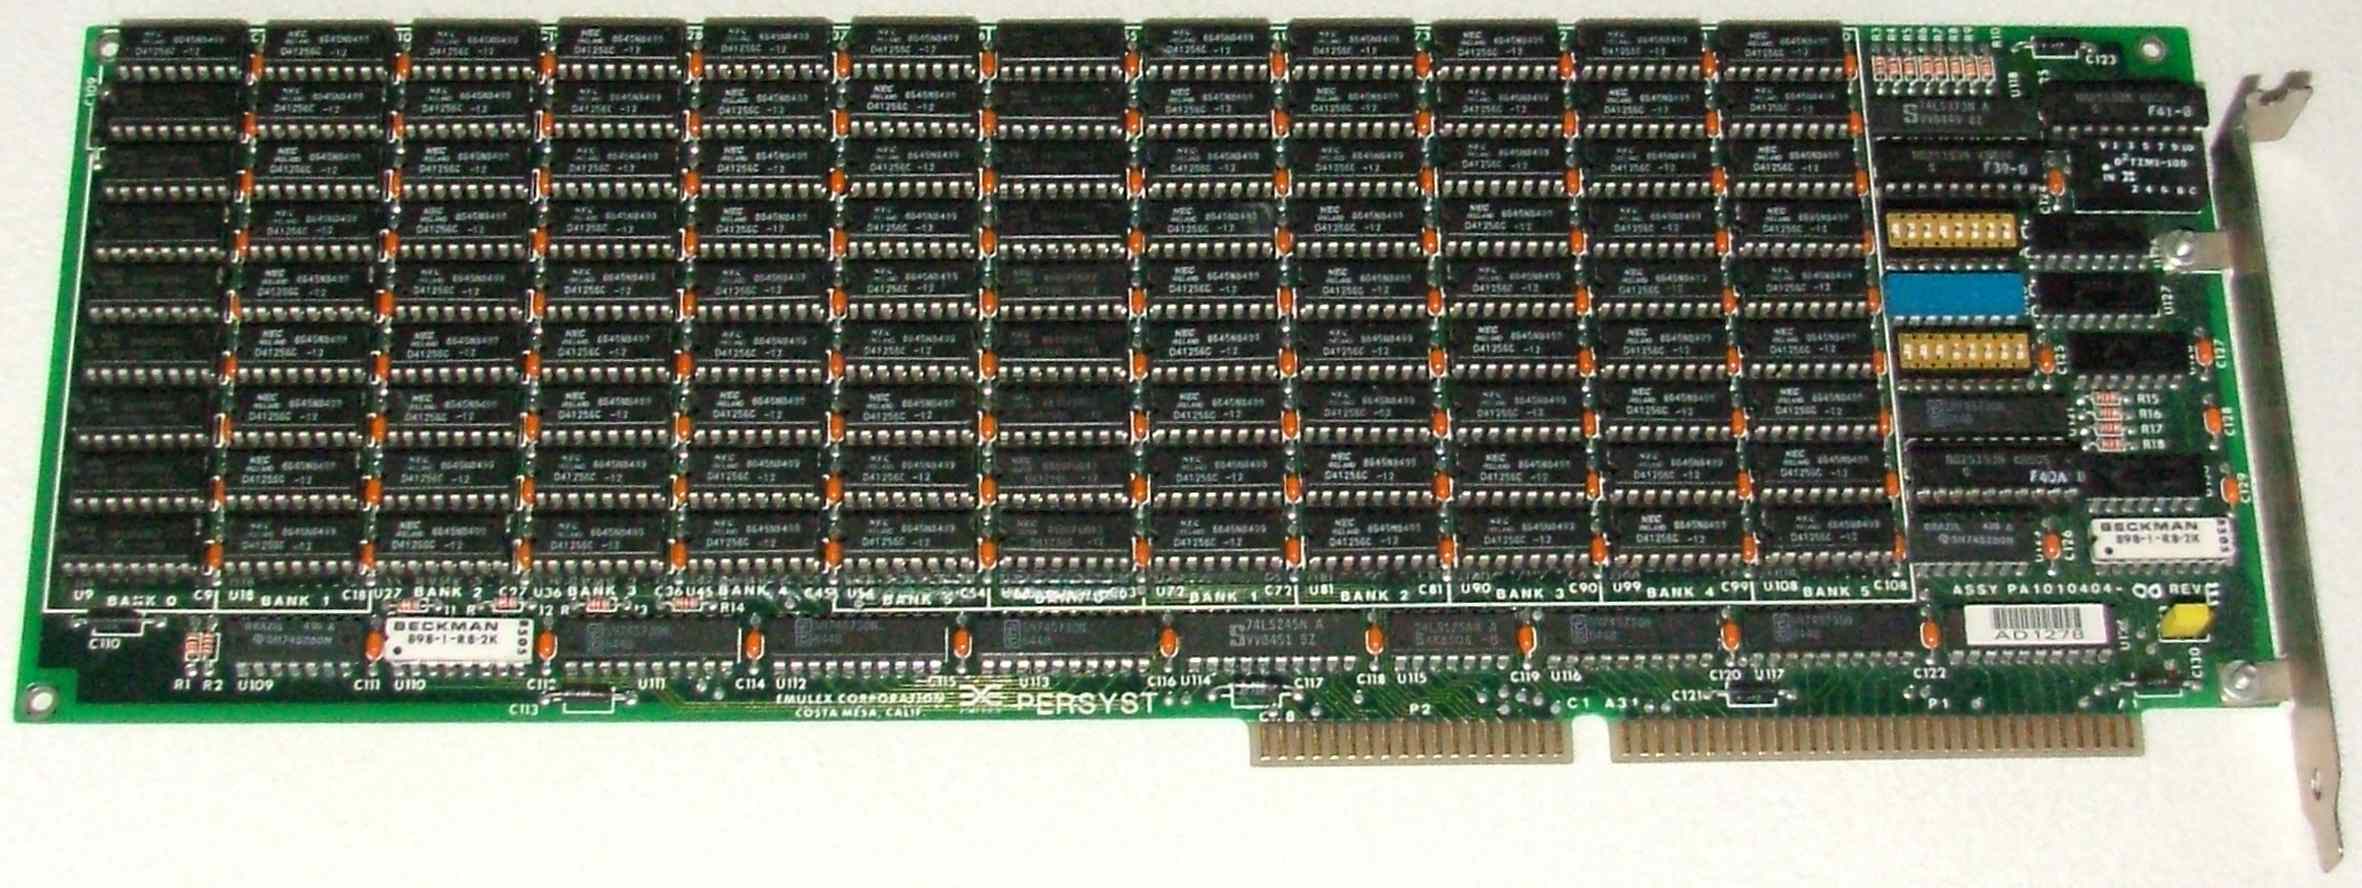
This is precisely what EMS did. EMS brought the idea of having a software API that allowed applications to select views into “other” memory by mapping a 64 KB window in upper memory to another memory chip. Originally, this other memory was supplied by expansion ISA cards like the one below, which means that EMS required hardware support and hardware-specific drivers to perform the window remappings. This also means, by the way, that this memory could be much slower than standard RAM.
As you can imagine, this trick offered the theoretical ability to access any amount of extra RAM on a machine… at the expense of having to structure your application so that it explicitly (re)configured the window. Implementing such applications is difficult and is also insufficient when applications need a larger address space to function comfortably. EMS was a useful kludge, but still a kludge.
The 80286 and protected mode
As the needs of programs and operating systems grew, processors themselves needed to grow more advanced features as well. In particular, they needed to gain the ability to access much more than just 1 MB of memory, and they needed to offer memory protection features to isolate programs from each other.
The 80286, still a 16-bit CPU, grew the address space to 24 bits to support up to 16 MB of RAM. It introduced a MMU to offer memory isolation. But there was a problem here: the 8086 memory addressing mode of 16-bit segment:offset pairs did not permit addressing memory beyond the first 1 MB. Thus the 80286 had to find a different way to reference the RAM beyond 1 MB, also known as extended memory, and it did so by introducing a completely different operation mode known as protected mode.
Once in protected mode, all memory access rules change. For one, the MMU takes charge of all memory accesses, ensuring that they are valid according to predefined protections. For another, the segment:offset addresses change their semantics. The segment portion of an address stops being a scaled down memory address, and instead becomes an index into a table (the GDT or LDT) of segment descriptors. Each segment descriptor describes the base address of a segment as a 32-bit quantity, the size of the segment as a 20-bit quantity, the access protections of the segment, and a bunch of flags.
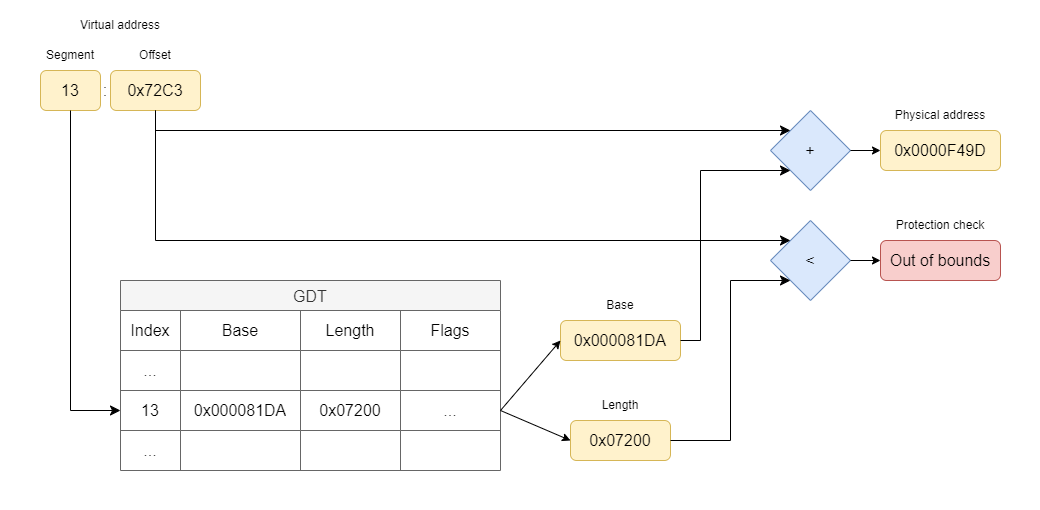
Under this model, instead of having an address like 81DA:72C3, we might see 13:72C3. To access this address, the MMU looks up entry 13 in the GDT, finds a descriptor that says that the segment starts at address 0x81DA and that it is 0x7200 bytes long, and concludes that the 13:72C3 reference is out of bounds, raising a General Protection Fault hardware exception (your dreaded “Segmentation fault” error these days).
But this access model is really different from what DOS applications were used to in real mode, and DOS itself was only designed to run in real mode. So DOS and all of its ecosystem were stuck in the real mode world, limited to addressing just 1 MB of memory without the ability to access extended memory… or were they?
The High Memory Area (HMA)
Avid readers might have noticed in a previous picture that, in real mode, there are a few segments that could, in theory, allow access to addresses above the 1 MB mark. Take FFFF:0010, which is 0xFFFF * 0x10 + 0x10 = 0x100000 = 2^20 or 1 followed by 20 zeroes in binary form. This is the first address into extended memory. The 8086 was able to produce such addresses, but they would wrap around because the 8086 had no way to issue the 21st bit to the memory bus.
For compatibility reasons, the 80286 had to truncate these addresses in real mode, and it did so by wiring the 21st line of the address bus (the A20) to zero. But what if the addresses didn’t wrap around? What if we told the 80286 to not truncate them? This can, in fact, be done by enabling the A20 gate—a task achieved via the keyboard controller, mind you. Enabling the A20 is a prerequisite for entering protected mode, but if done in real mode, it becomes possible to access an extra 64 KB of memory. This extra memory is known as the High Memory Area (HMA).
The HMA isn’t big by any means, but conventional memory was so limited that any tricks to gain extra memory were welcome and DOS did precisely that. By loading the HIMEM.SYS driver and by specifying DOS=HIGH in the CONFIG.SYS file, DOS would relocate parts of itself into the HMA to free up to 64 KB of conventional memory.
Unfortunately, 64 KB of extra memory really aren’t that much. This is a nice trick, but applications really needed access to more memory.
eXtended Memory Specification (XMS)
Another technique to access extended memory (the memory visible beyond the first 1 MB) came in the form of the eXtended Memory Specification (XMS).
The idea of XMS is to provide an API that real mode applications can use to allocate chunks of extended memory and to copy data from/to those chunks via explicit calls. This is different from EMS because we aren’t talking about a fixed window of the address space referencing some external memory: we are talking about an API that is able to allocate arbitrary chunks of memory and return references to them, much like malloc and free do. Applications then use extra APIs to copy memory from/to those extended memory chunks into conventional memory.
To implement the XMS API, a driver such as HIMEM.SYS uses protected mode to manipulate the extended memory blocks, but the real mode applications never have to. Because XMS requires protected mode, this feature is only available in the 80286 and above processors, whereas EMS could be used by the 8086 with the right hardware assistance.
Much like EMS, XMS provided the theoretical ability to access an unlimited amount of extended memory from real mode at the expense of having to manually transfer small pieces of it into the limited 1 MB address space. This is not a trivial difficulty and is why even modern architectures like the Cell processor and its SPEs with a separate and limited address space didn’t succeed.
So far so good, but… we can still squeeze some extra memory out of the real mode segmented address space. In particular, we still have some gaps in upper memory that we haven’t put to use.
The 80386 and VM86 mode
To make further improvements possible, we need the additional processor features that came with the 80386. Compared to the 80286, the 80386 was a 32-bit processor capable of addressing up to 4 GB of RAM. More interesting for our discussion, however, were the addition of pagination—which is the foundation of any modern operating system—and a new execution mode known as Virtual 8086 or VM86 for short.
VM86 was originally envisioned to fix a major deficiency in the 80286: that is, the ability to run multiple concurrent real mode applications from within a protected mode operating system because that’s what Windows and OS/2 wanted to provide. In today’s terms, VM86 acts as virtual machine hypervisor, providing the processor with a mechanism to enter a mode that behaves like real mode but that is backed by the protected mode MMU. All memory accesses are subject to translation via pagination and all privileged operations trap into protected mode, meaning that a hypervisor process can place VM86 tasks anywhere in the 4 GB memory address space and can context-switch between them.
But what if our hypervisor only spawned a single VM86 task to run DOS in? What if, then, the hypervisor leveraged the MMU to relocate portions of the real mode address space into portions of extended memory? That way, we could emulate EMS without dedicated hardware, providing applications a trivial way to peek into extended memory via 64 KB windows, or we could play other tricks… like UMBs.
Upper Memory Blocks (UMBs)
Remember the sparse upper memory area? Those 384 KB of memory wired to hardware devices but with gaps in them? What if we could take those gaps in upper memory and map them to some extended memory so that they were directly addressable from real mode? This is precisely what Upper Memory Blocks (UMBs) are: portions of the upper memory area remapped to extended memory by means of VM86, transparently offering access to more memory from real mode.
As an example, think about the video memory mappings in the original PC specification. The memory map reserved two chunks of the address space for video: one for monochrome displays and one for color displays. But only one of them can be in use at any given time. So whichever video mode is selected leaves the address space of the other mode unused, and thus such address space can be leveraged by the system as an UMB into which to load drivers or place user data.
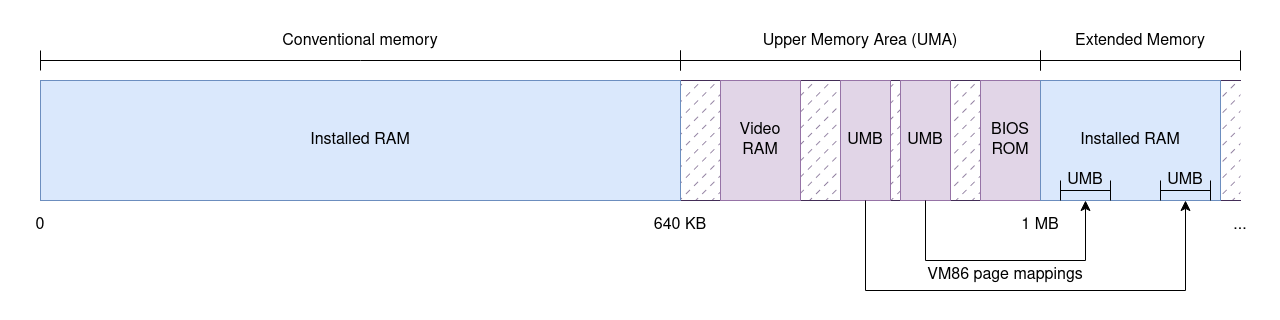
In DOS, the EMM386.EXE driver is in charge of providing UMBs. In principle, the chipset could also implement them in older processors, but the 80386 made this all possible in software by entering VM86 and then leveraging pagination to map pages of extended memory in the upper memory area.
When UMBs are available, DOS offered ways to move load drivers and TSR programs into UMBs by specifying DOS=UMB in the CONFIG.SYS file and then using the DEVICEHIGH and LOADHIGH commands.
Putting it all together
In summary, we have seen four different techniques that evolved over time to squeeze the most memory out of the incredibly limited 1 MB address space of the 8086. These limitations haunted the PC ecosystem until Windows took over and it can be argued that Windows “won” because it made it much easier to take advantage of the larger address space of the 80386. Until that happened, however, users had to live with the EMS, XMS, HMA, and UMB mess.
And a mess it was, and it was so pervasive that it leaked to users. Let’s take a look at the output of the MEM command, which was a very common utility to run when trying to maximize free conventional memory. In one of its simplest forms, MEM /C, the command shows a summary of the memory usage per program and whether they are loaded in conventional or upper memory:

MEM /D, which I did not know about back in the day, is more interesting. I have to show you its output as three separate images due to console size limitations:
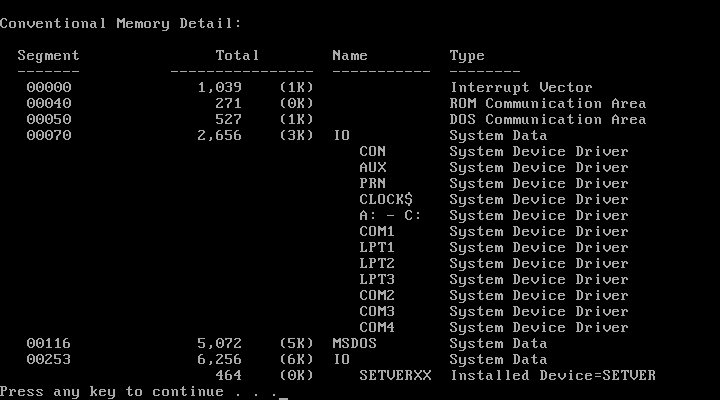
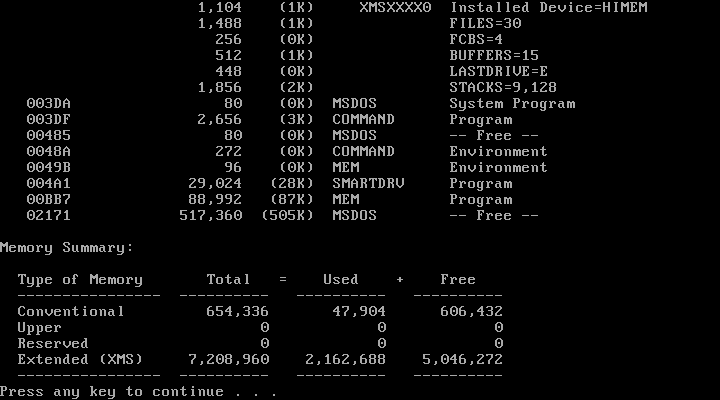
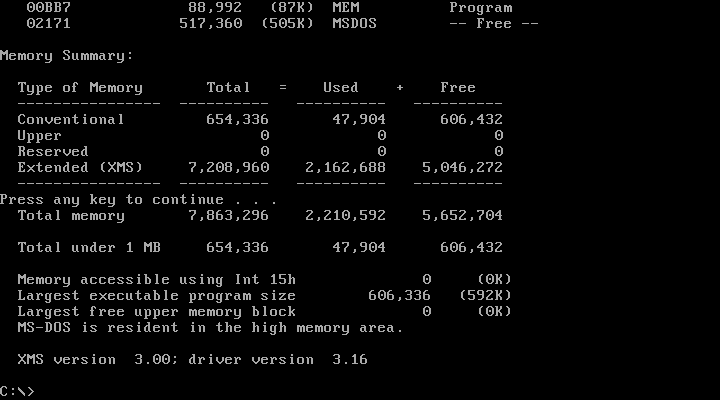
MEM /D shows us the memory map of the machine along with details about the location of each program. We can also see mentions of the conventional vs. upper address space, whether the HMA is in use, and consumption of XMS memory.
But in all of these outputs, we see that upper memory is not in use at all. Why is that? Well, because MS-DOS out of the box doesn’t attempt to load drivers into it. For that, we have to manually modify CONFIG.SYS and AUTOEXEC.BAT with special commands and reorder entries to maximize the usage of the upper memory and the HMA. A black art.
Which brings me to MemMaker, a tool that debuted with MS-DOS 6. This tool attempted to automatically reconfigure all drivers and TSRs loaded during boot so that the largest/majority of them fit in upper memory, leaving as much conventional memory free for application usage.
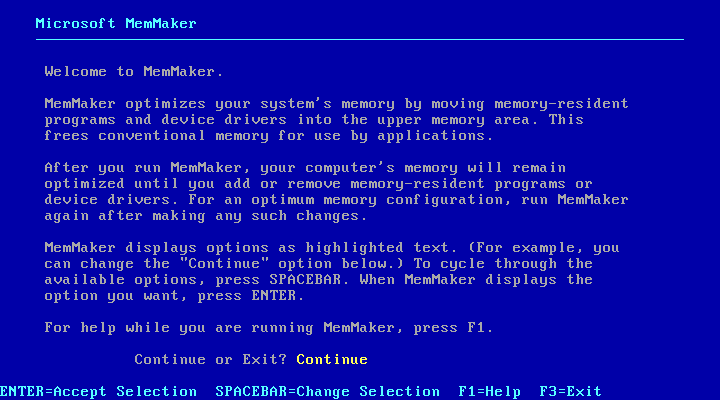
As automated as it was, however, I’d say that MemMaker was an experts-only tool. Take a look at its advanced configuration options page, which I had to fiddle with to make the tool work in a KVM virtual machine running MS-DOS 6.22. You really need to understand the intricate details of real mode memory management to know what each of these options is about.

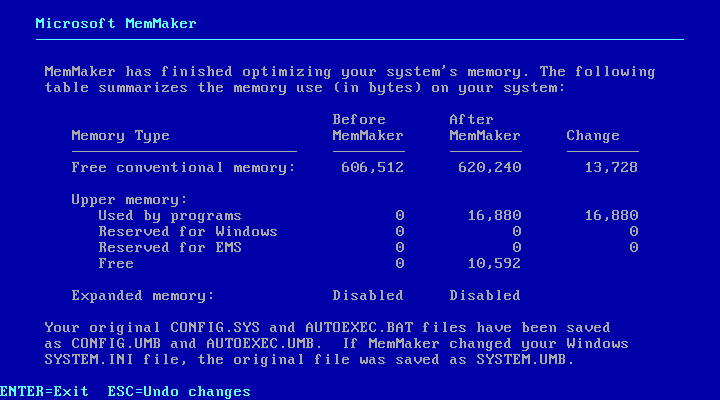
But if you made MemMaker run successfully, it would then greet you with a pretty cool page after a reboot. This page showed a breakdown of the changes made by MemMaker and how it was able to reclaim conventional memory.
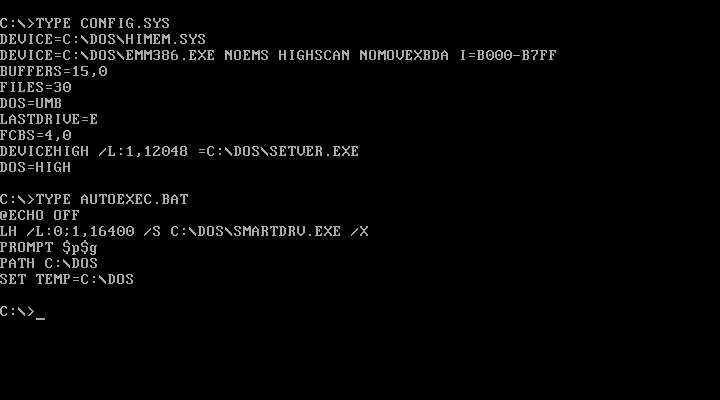
After that, we can look at the changes that MemMaker applied to the CONFIG.SYS and AUTOEXEC.BAT files. I never truly understood what all of these magic numbers meant, but now that I went through the hassle of researching and writing this article, I finally do. Just 30 years after I regularly used MemMaker to be able to play games in my multimedia 80386.
You can much read more in Microsoft’s own now-archived KB-Q9555 article or the DOS Beyond 640KB book.
And that’s it for today folks. I intentionally did not touch on DPMI—the technology that truly allowed DOS applications to break free from the 1 MB memory limitation—because I’m saving that for the next article. So, make sure to come back for more!
