Hello again Blog System/5 and sorry for the radio silence for the last couple of months. I had been writing too much in here and neglecting my side projects so I needed to get back to them. And now that I’ve made significant progress on cool new features for EndBASIC, it’s time to write about them a little!
One of the defining characteristics of EndBASIC is its hybrid console: what looks like a simple text terminal at first glance can actually render overlapping graphics and text at the same time. This is a feature that I believe is critical to simplify learning and it first appeared with the 0.8 release back in 2021.
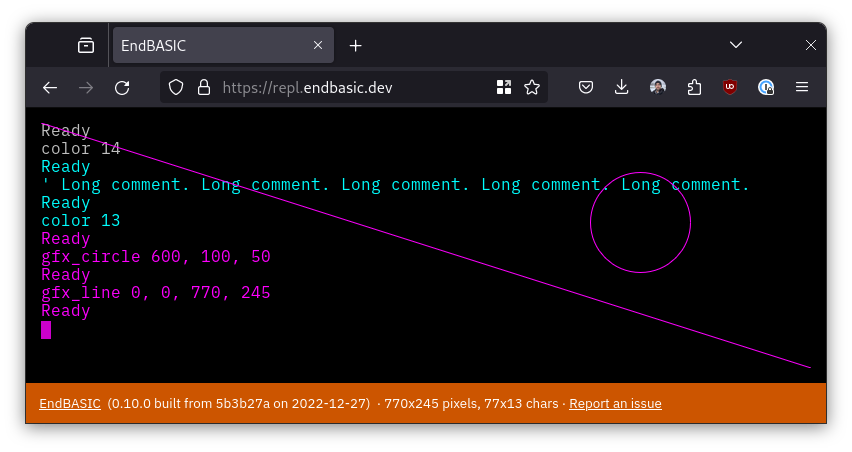
A few months before that, I had added support for simple GPIO manipulation in the 0.6 release and, around that same time, I impulse-bought a tiny LCD for the Raspberry Pi with the hope of making the console work on it. But life happened and I lost momentum on the project… until recently.
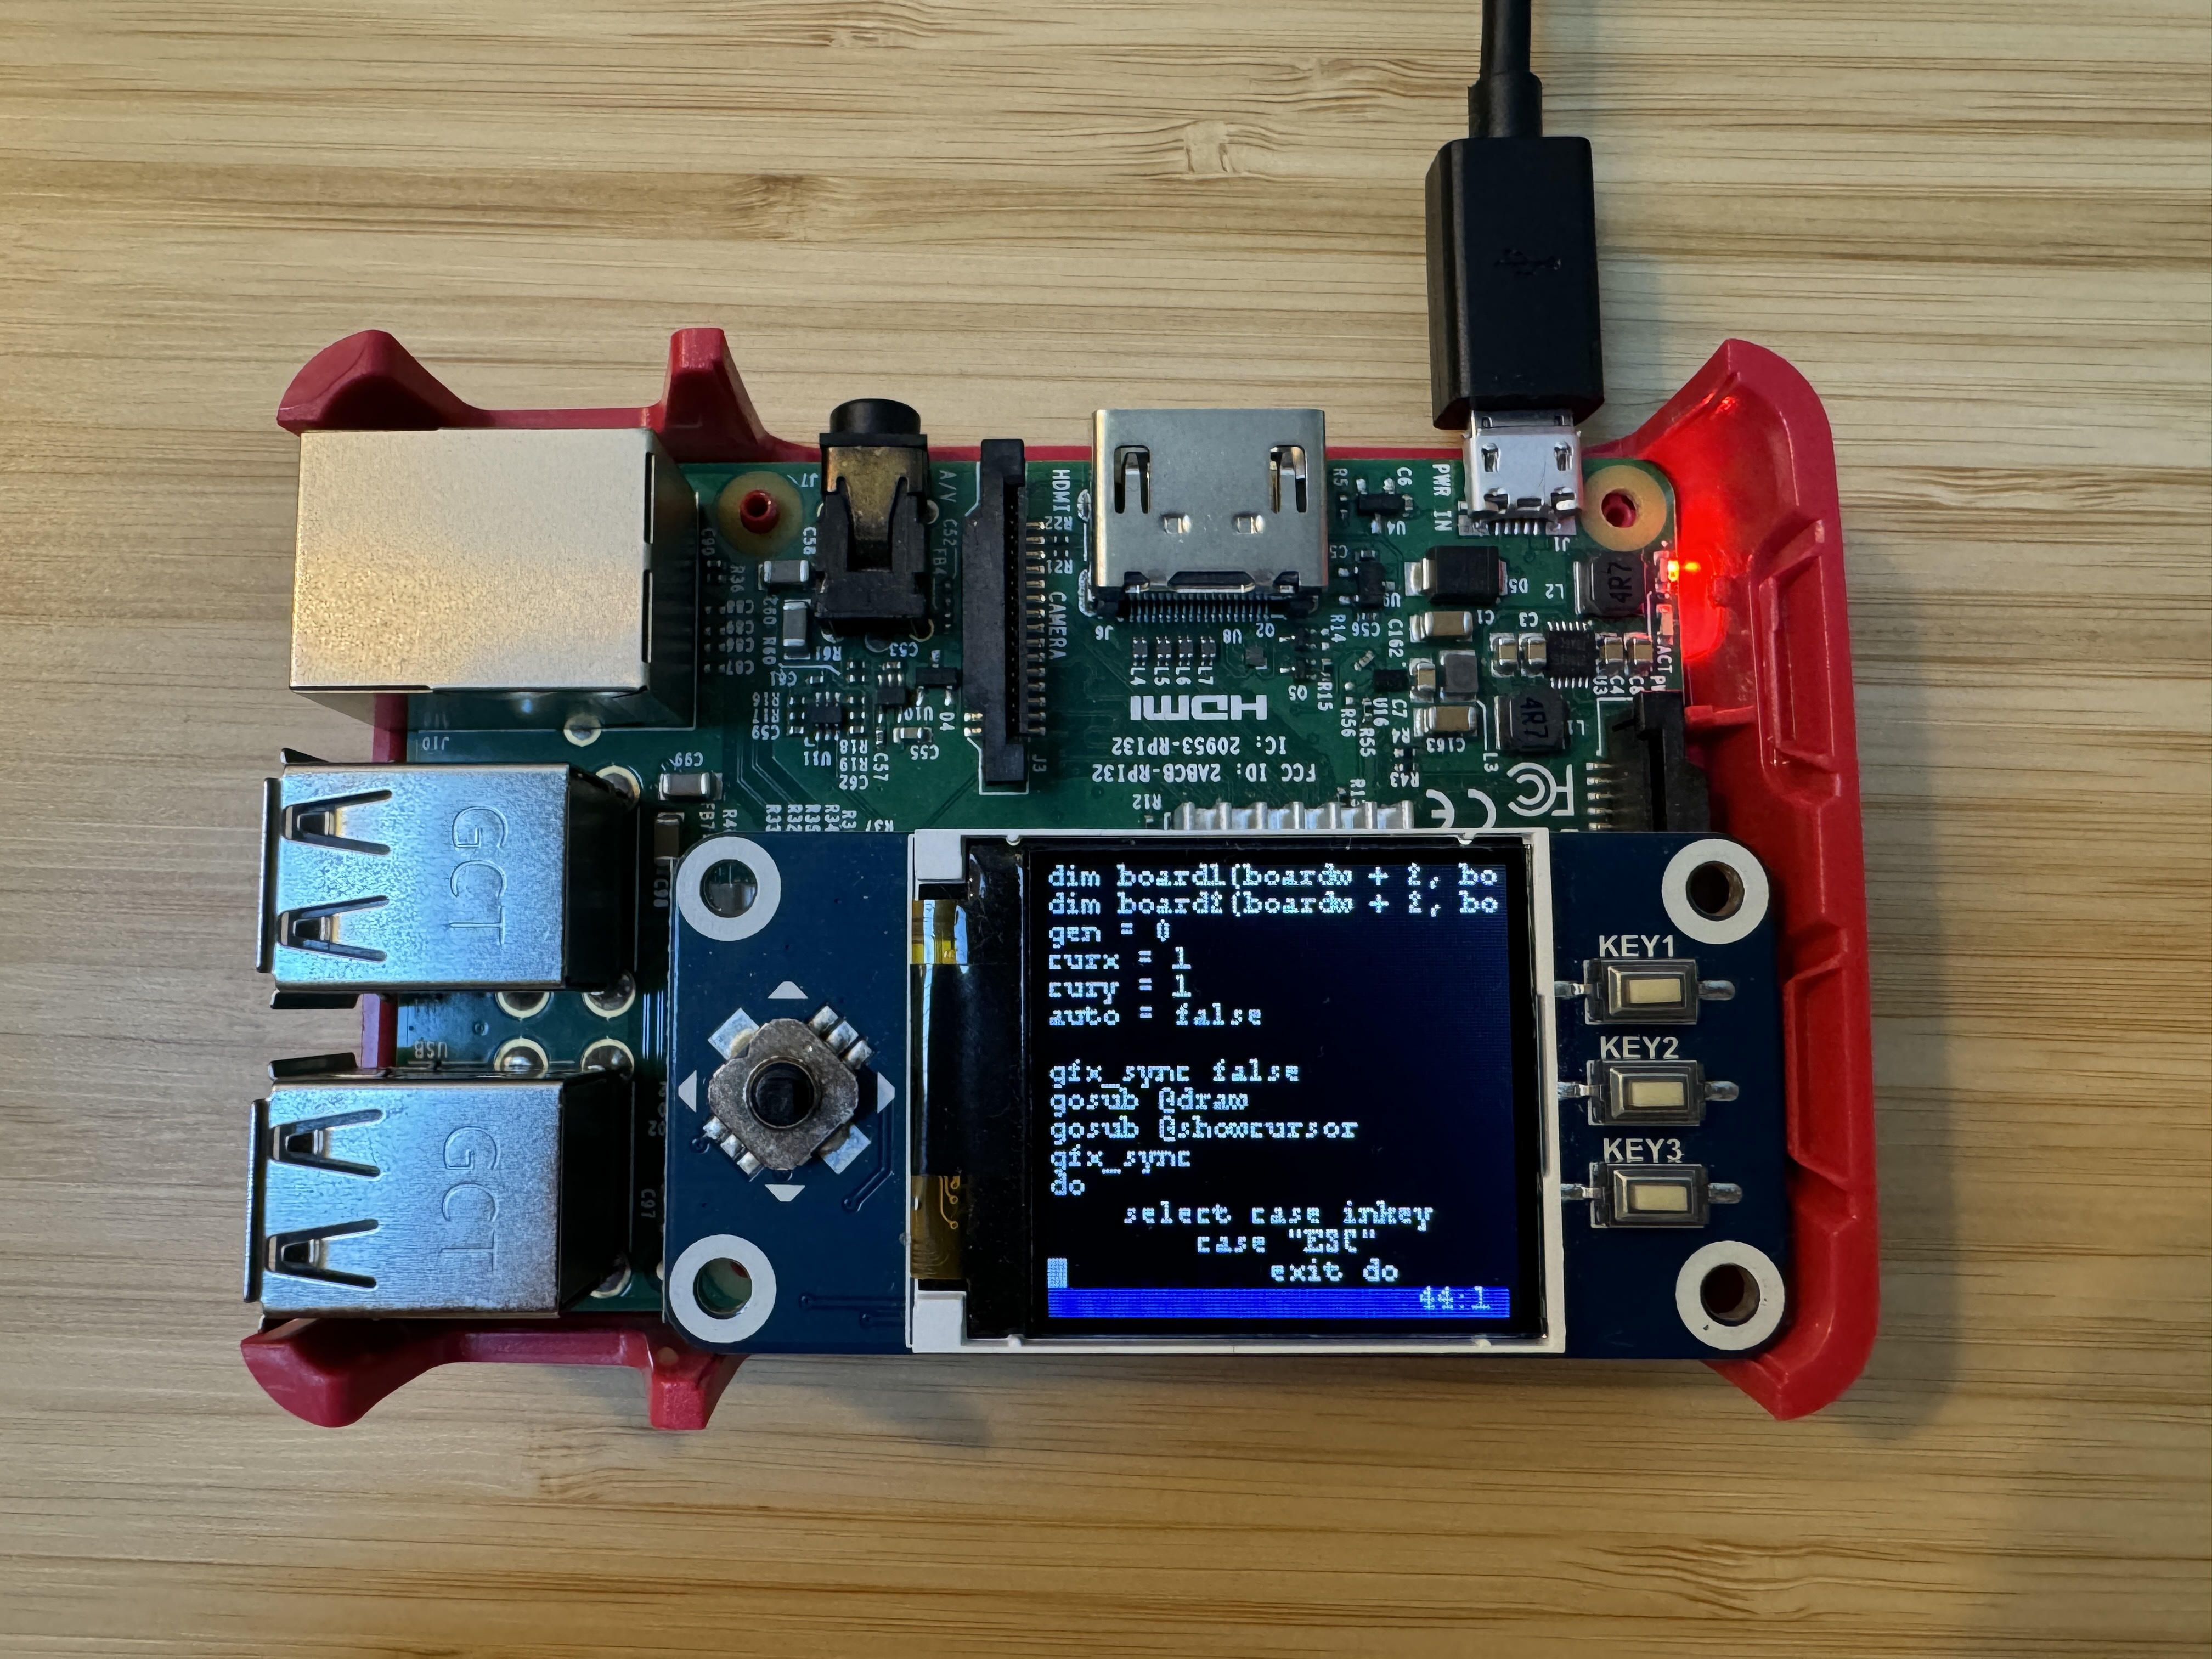
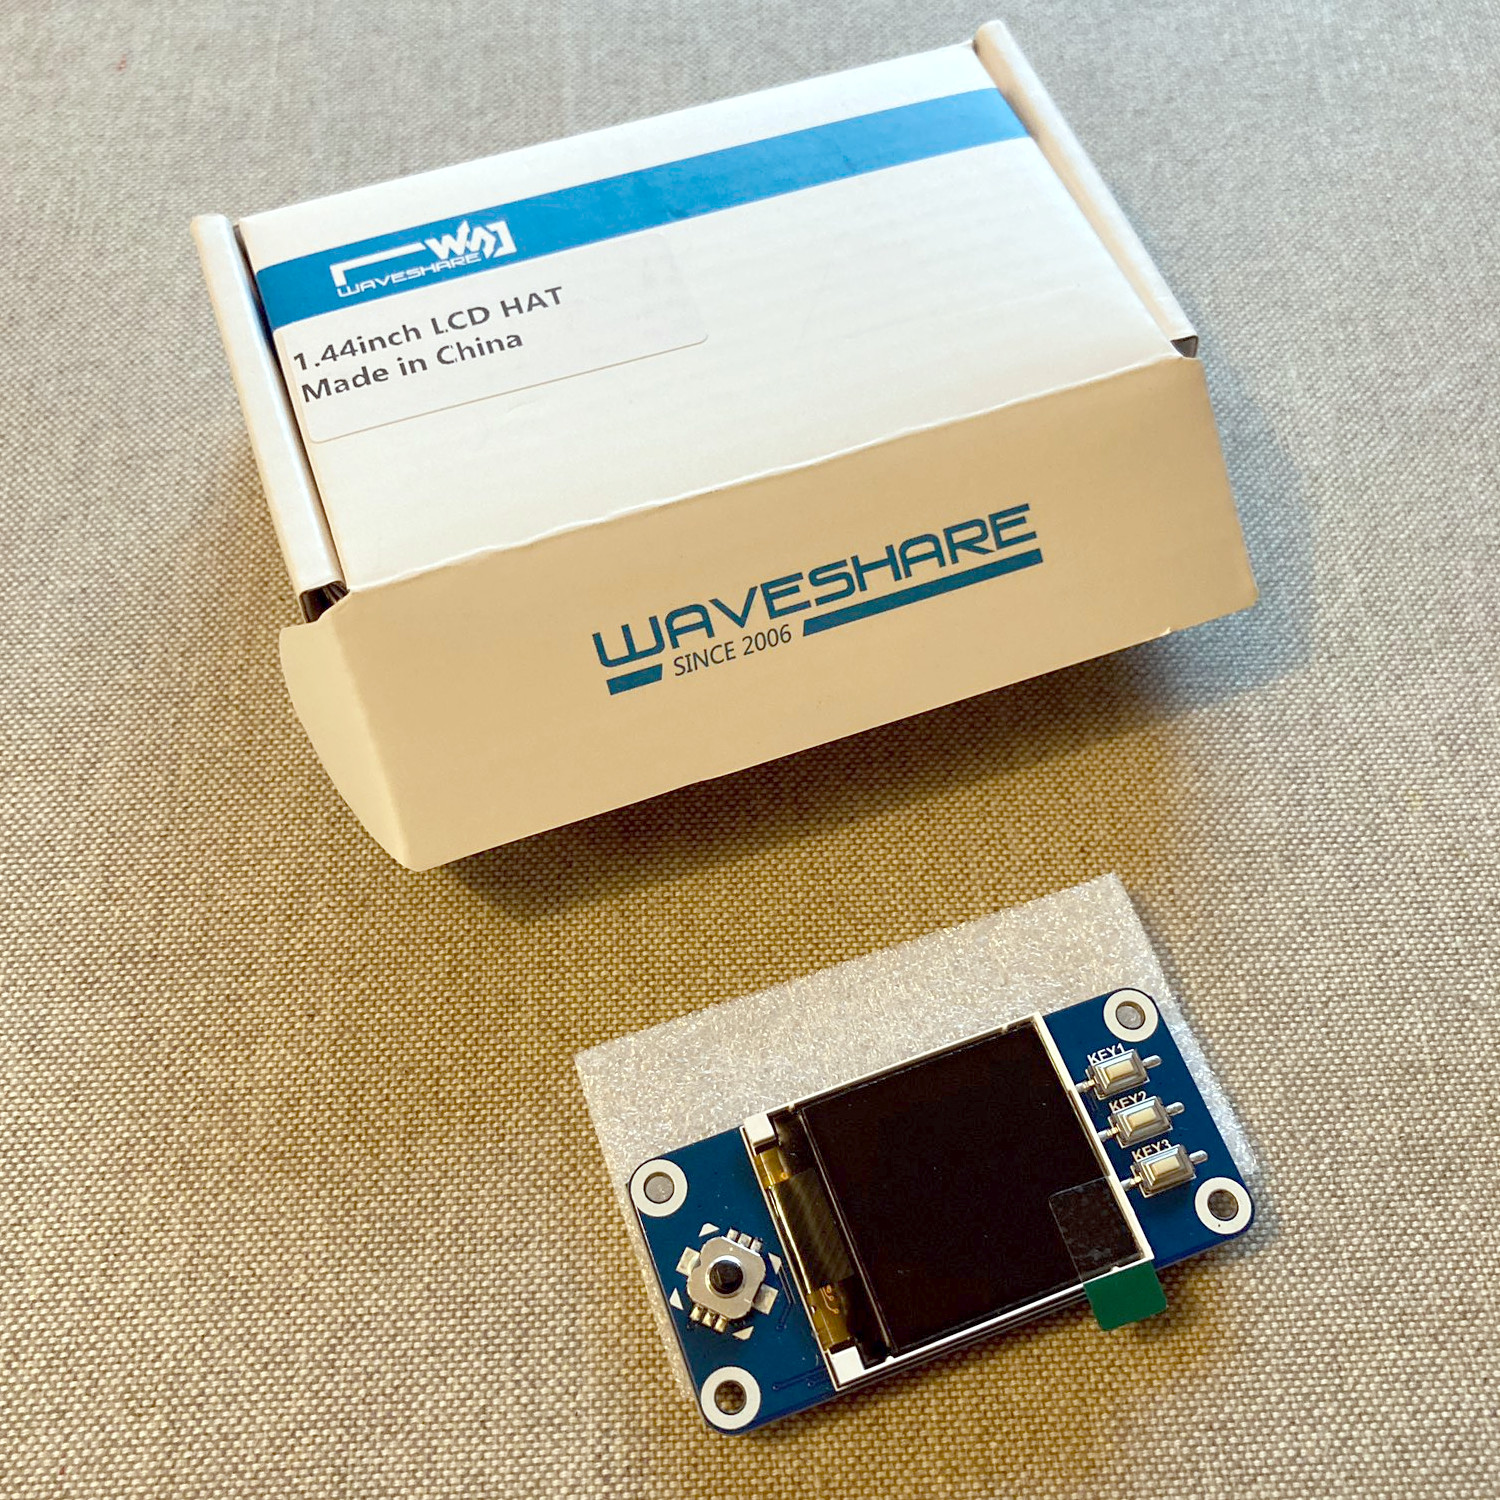
In this post, I’ll guide you through the process of porting the EndBASIC hybrid console to the ST7735s 1.44" LCD shown below, which sports a resolution of 128x128 pixels, a D-pad, and 3 other buttons. I will cover the prerequisite work to make the port possible, dig into the GPIO and SPI interface of an LCD, outline the design for a fast rendering engine, and conclude with pointers for you to build your own “developer kit”. Let’s go!
Previous implementation
Even though I had plans to support graphics in the EndBASIC console from the very beginning, the first versions of the product did not support graphics. That fact didn’t prevent me from defining a Console abstraction anyway because I needed to support various operating systems and, more importantly, write unit tests for the console. Such abstraction was a straightforward trait representing text-only operations, like this:
trait Console {
    fn clear(&mut self, how: ClearType) -> io::Result<()>;
    fn color(&self) -> (Option<u8>, Option<u8>);
    fn print(&mut self, text: &str) -> io::Result<()>;

    // ... and more text operations ...
}
Later on, when the time came to add graphics support, I extended the Console trait with additional rendering primitives, like this:
trait Console {
    // ... same as previous ...

    fn draw_circle(&mut self, _center: PixelsXY, _radius: u16) -> io::Result<()> {
        Err(io::Error::new(io::ErrorKind::Other, "No graphics support"))
    }

    fn draw_pixel(&mut self, _xy: PixelsXY) -> io::Result<()> {
        Err(io::Error::new(io::ErrorKind::Other, "No graphics support"))
    }

    // ... and more graphics operations ...
}
What constitutes a primitive or not depends on the graphics device. In the snippet above, it’s fairly easy to understand why draw_pixel exists. But why is draw_circle there? SDL2, for example, does not provide a circle drawing primitive and forces you to implement your own algorithm on top of individual pixel plotting. However, the HTML canvas element does provide such a primitive and thus it is important to expose access to it for performance reasons.
A reasonable design, right?
Not quite. The problem is that mixing the textual and graphical operations under just one abstraction bundles two concepts together. Take, for example, the innocent-looking print function: writing text to the console requires knowing the current cursor position, writing text at that location, wrapping long lines, and then updating the cursor position and moving its glyph. This sequence of operations is given to us “for free” when the Console is backed by a terminal—the kernel or terminal emulator handle all details—but none of this exists when you stare at a blank graphical canvas.
As a result, the SDL2 and the HTML canvas console implementations had to supply their own code to represent a textual console on top of their backing graphical canvases. But due to tight timelines—I wanted to release graphics support in time for a conference—I ended up with a lot of copy/pasted code between the two. Unfortunately, it wasn’t just copy/pasted code. Oh no. It was copy/pasted code with minor variations throughout. For example: SDL2 coordinates are i32 whereas HTML canvas coordinates are floats.
This duplication with minor differences required unification before attempting to write a console driver for the LCD because I could not afford to introduce yet another duplicate of the same code.
Past NetBSD experience to the rescue
The first step to resolving this conundrum was to unify the implementation of the two graphical consoles as much as possible. Having worked on NetBSD’s wscons console framework eons ago, I knew how this had to be done.
The idea was to separate the text console manipulation from the underlying graphics primitives. As you can imagine, the way to do this was via a new abstraction, RasterOps, providing direct access to the “raster operations” of the graphics device. Take a look:
trait RasterOps {
    fn draw_circle(&mut self, center: PixelsXY, radius: u16) -> io::Result<()>;
    fn draw_pixel(&mut self, xy: PixelsXY) -> io::Result<()>;
    fn move_pixels(&mut self, x1y1: PixelsXY, x2y2: PixelsXY, size: SizeInPixels)
        -> io::Result<()>;
    fn write_text(&mut self, xy: PixelsXY, text: &str) -> io::Result<()>;

    // ... and more operations ...
}
As you can see in this snippet, the earlier operations draw_circle and draw_pixel exist as raster operations because some devices may provide them as primitives. But we now see other functions like move_pixels and write_text (which differs from print because it writes text at a specific pixel location, not at the “current cursor position”) and these are meant to expose other primitives of the device.
Having done this, I added a new GraphicsConsole type that encapsulates the logic to implement a terminal backed by an arbitrary graphical display, and then relies on a specific implementation of the RasterOps trait to do the screen manipulation:
impl<RO> Console for GraphicsConsole<RO>
where
    RO: RasterOps,
{
    // ... implement Console in terms of RasterOps ...
}
Most details of this refactor are uninteresting at this point, except for the fact that it eliminated all of the tricky duplicate code between the SDL2 and HTML canvas variants. A side-effect was that these changes increased my confidence in the HTML canvas variant because most code was now unit-tested indirectly via the SDL2 implementation. Here is how the simplification looked like:
$ wc -l {before,after}/sdl/src/host.rs {before,after}/web/src/canvas.rs
 1245 before/sdl/src/host.rs
  887 after/sdl/src/host.rs     # 358 fewer lines
  760 before/web/src/canvas.rs
  444 after/web/src/canvas.rs   # 320 fewer lines
I was now ready to reuse the GraphicsConsole to quickly provide a new backend on top of the LCD.
Playing with the C interface
With the foundational abstractions in place, it was time to prove that my idea of rendering the EndBASIC console on the tiny LCD was feasible cool enough to pursue. But I knew absolutely nothing about the LCD so, before diving right into the “correct” implementation, I had to create a prototype to get used to its API.
Fortunately, I found an “SDK”—and I put it in quotes because SDK is quite an overstatement—for the LCD somewhere online. The SDK consists of a pair of C and Python libraries that provide basic graphics drawing primitives, text rendering, and access to the D-pad and the buttons. This was a “perfect” finding because the code was simple enough to understand, functional enough to build a prototype, and allowed me to skip reading through the data sheet.
So I chose to do the easiest thing: I folded the C library into EndBASIC using Rust’s C FFI and quickly implemented a RasterOps on it. With that, I could instantiate a GraphicsConsole backed by the LCD and demonstrate, in just a couple of hours before the crack of dawn, that the idea was feasible. And it was more than feasible: it was super-exciting! Here, witness the very first results:
But performance was also awful. Using the C library was enough to show that this idea was cool and worth pursuing, but it was not the best path forward. On the one hand, the code in the C library was rather crappy and fragile to integrate into Rust via build.rs; and, on the other hand, I needed precise control of the hardware primitives to achieve good rendering performance levels.
The LCD hardware interface
Before diving into the solution, let’s take a quick peek at the hardware interface of the LCD. Note that this is just a very simplified picture of what the LCD offers and is derived from my reverse-engineering of the code in the SDK. I’m sure there is more to it, but I do not have the drive to go through the aforementioned data sheet.
The LCD is a matrix of pixels where each position contains an integer representing the color of the pixel. The representation of each color value depends on the selected pixel format, but what the SDK uses by default is RGB565: a 16-bit value decomposed into two 5-bit quantities for red and blue and one 6-bit quantity for green.
This is pretty standard stuff for a framebuffer-style device but the mechanism to write to the LCD is different. Unlike most framebuffer devices backed by video cards, the LCD matrix is not memory-mapped: we have to issue specific reads and writes via the GPIO and SPI busses. The GPIO bus is used to control hardware registers and the SPI bus is used to transfer large data sequences.
Simplifying, the LCD offers just two primitives. The first is a “set window” operation to define the window for rendering. This tells the LCD what rectangular region to update with new pixel values on the subsequent “set data” operation. Executing this operation requires a GPIO write to select the operation followed by an SPI write to set the window position and dimensions.
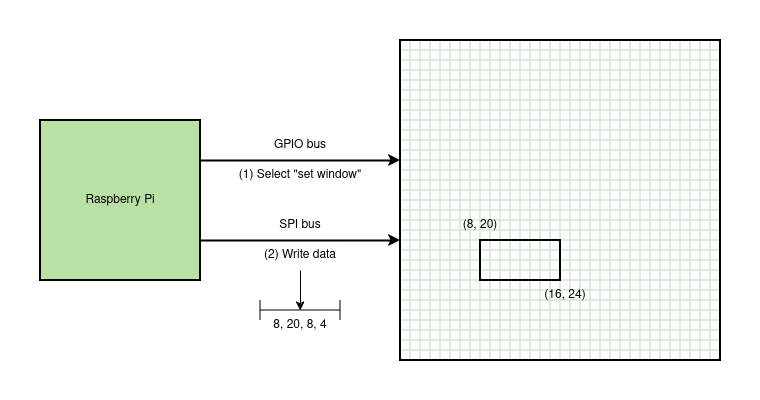
The second is a “set data” primitive to set the contents of the previously-defined window. This primitive just sends a stream of pixel color values that will be written on the window, top-left to bottom-right. Executing this operation requires a GPIO write to select the operation followed by a “very large” SPI write to write the pixel data.
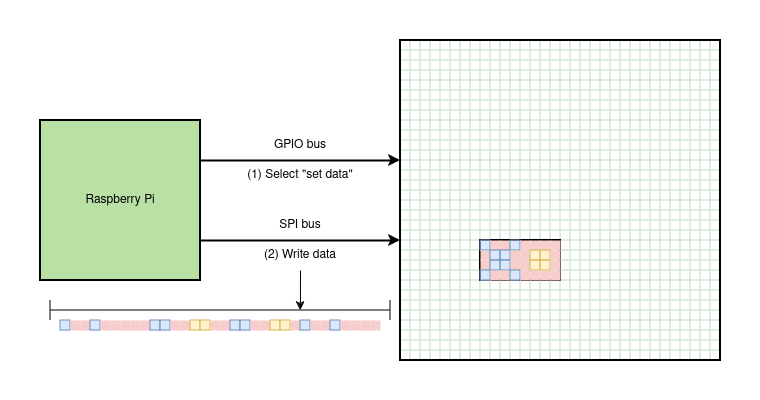
By default, SPI writes on Linux are limited to 4KB in size and the full LCD content is 128x128 pixels * 2 bytes per pixel = 32KB, which means drawing the whole LCD requires 8 separate SPI writes. (It is possible to raise the default via a kernel setting, which I did too, but let’s ignore that for now.)
Understanding that the LCD hardware interface is as simple and constrained as this is super-important to devise an efficient higher-level API, which is what we are going to do next.
Double-buffering
Having figured out the native interface, I faced two problems.
The first one was performance. Issuing individual “set window” and “set data” commands works great to draw on large portions of the LCD, but sending these commands on a pixel basis as would be necessary to render letters or shapes like circles would be prohibitively slow.
The second one was the inability to read the contents of the LCD. Certain operations of the console, like moving the cursor or entering/exiting the builtin editor, require saving portions of the screen aside for later restoration. The LCD does not offer an interface to read what it currently displays. (Actually I don’t know because I did not read the data sheet… but even if it does, the reads would involve slow SPI bus traffic which we should avoid.)
To address these two problems, I decided to implement double-buffering for the LCD: the console driver reserves a portion of main memory to track the content of the LCD and all operations that update the LCD first write to this buffer. This allows the code to decide when to send the buffer to the LCD, allowing it to compose complex patterns in memory—e.g. plotting letters pixel by pixel—before ever touching the GPIO and SPI busses. And this also allows trivially reading portions of the LCD.
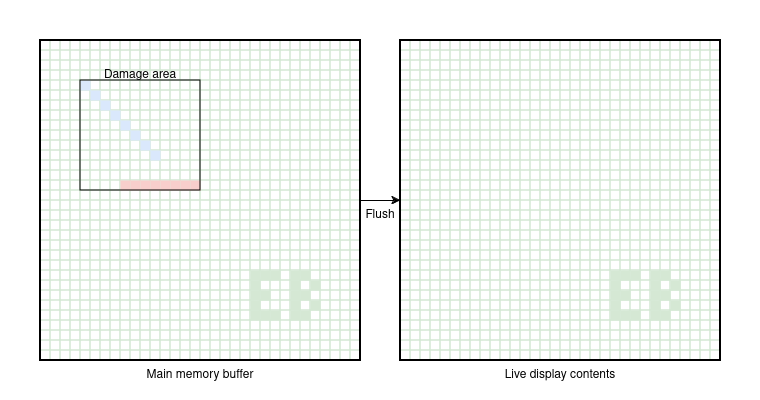
Which brings me to the next point. Part of this solution required adding damage tracking as well. Flushing the full in-memory buffer to the LCD is expensive—remember, with the default SPI configuration, we need to issue 8 separate writes to flush 32KB of data—and many times, like when moving the cursor around in the editor, this is not necessary. Therefore, it is important to keep track of the portion of the display that has been “damaged” by drawing operations and then only flush that portion of the buffer to the LCD. This maps perfectly well to the hardware primitives offered by the LCD.
With that in mind, and after a bit of iteration, I ended up splitting the implementation of the LCD RasterOps into two pieces. One is the Lcd trait, which exposes the basic “set window” and “set data” primitives of an LCD as a single set_data operation:
trait Lcd {
    fn set_data(&mut self, x1y1: LcdXY, x2y2: LcdXY, data: &[u8]) -> io::Result<()>;

    // ... some more stuff ...
}
The other is the BufferedLcd type, which implements the general idea of buffering and damage tracking on top of a generic Lcd:
impl<L> RasterOps for BufferedLcd<L>
where
    L: Lcd,
{
    // ... implementation of RasterOps in terms of an Lcd ...
}
This design keeps all of the complex logic in one place and, as was the case with the Console abstraction, allowed me to unit-test the tricky corner cases of the double-buffering and damage tracking by supplying a test-only Lcd implementation. This was critical during development because I wrote most of this code while I was on a trip without access to the device, and when I came back home, the “real thing” worked on the first try.
Invest in Rust and exhaustive unit testing! They really are worth it to deliver working software quickly. But I digress…
Font rendering
The last interesting part of the puzzle was rendering text. You see: for the previous graphical consoles I wrote based on SDL2 and the HTML canvas element, I was able to use a nice TTF font. But with the LCD… well, the LCD has no builtin mechanism to render text and the very restrictive 128x128 resolution means that most fonts would render poorly at small sizes anyway.
To solve this problem, I had to implement my own text rendering code, which sounds scary at first but isn’t as hard as it sounds. One issue was coming up with the font data, but the SDK for the LCD came with a free reusable 5x8 font that I took over. Another issue was coming up with a mechanism to efficiently render the letters because plotting them pixel by pixel on the LCD would be unfeasible, but this was solved by the previous buffering and damage tracking techniques.
Having my own font rendering code is interesting. If you used a BASIC machine back in the 1980s, the computer-supplied manual would show you the glyphs used by the machine like this page demonstrates:
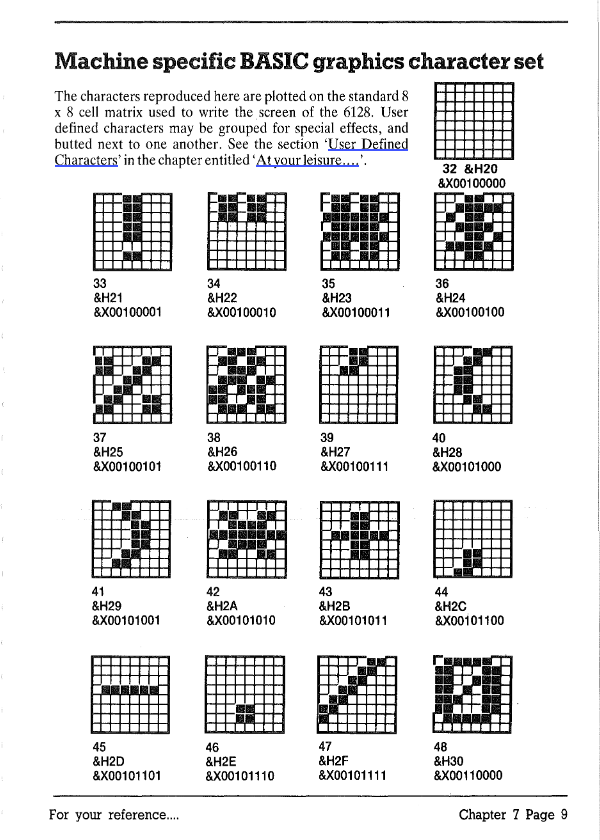
In some machines like the Amstrad CPC 6128, you could use the SYMBOL command to define your own glyphs. And in some others, you could POKE the memory locations where the glyphs were stored to (re)define them. So I’m thinking that… maybe I should forget about the TTF font and instead expose a custom bitmap font in all EndBASIC consoles to allow for these neat tricks.
Putting it all together
And that’s all folks! Having gone through all the pieces involved in providing support for the LCD, we can now connect them all. Here is how the code on the main branch looks like with additional inline commentary:
// Instantiate access to the GPIO bus, required to control the LCD and
// to read the status of the D-pad and buttons.
let mut gpio = Gpio::new().map_err(gpio_error_to_io_error)?;

// Build the struct used to interface with the LCD.
let lcd = ST7735SLcd::new(&mut gpio)?;

// Wrap the low-level LCD with the double-buffering and damage tracking
// features for high speed.
let lcd = BufferedLcd::new(lcd);

// Instantiate the input controller. I haven't covered this in the post
// because it's uninteresting.
let input = ST7735SInput::new(&mut gpio, signals_tx)?;

// Wrap the display and the buttons with the generic graphical console
// logic -- the same one used by the SDL2 and HTML canvas variants.
let inner = GraphicsConsole::new(input, lcd)?;
Even though this looks complex, this composition of three different types keeps the responsibilities of each layer separate. The layers help make the logic simpler to understand, allow the possibility of supporting more LCDs with ease, and make unit-testing a reality. And thanks to Rust’s static dispatch, the overhead of the separate types is minimal.
Witness the finished result:
Build your own Developer Kit
Does the above sound cool? Do you want to play with it? Here are the parts you’ll need to build you own:
Raspberry Pi 3 B+: I suppose a newer model will work but I don’t have one to try it out; let me know if it does! I also have my eyes on the Libre Computer Board - Le Potato, but if you go this route, know that it will definitely require extra work in EndBASIC to be functional. Hardware donations welcome if you want me to give it a try 😉.
CanaKit 5V 2.5A Power Supply: Yes, the Raspberry Pi is USB-powered but you need a lot of power for it to run properly—particularly if you are going to attach any USB devices like hard disks. Don’t skimp on the power supply. This is the one I have and works well.
PNY 32GB microSD card: Buy any microSD card you like. The SD bay is incredibly slow no matter what and 32GB should be plenty for experimentation.
waveshare 1.44inch LCD Display HAT 128x128: The star product of this whole article! You may find other LCD hats and I’m sure they can be made to work, but they’ll require code changes. Hopefully the abstractions I implemented make it easy to support other hats, but I can’t tell yet. Again, hardware donations welcome if you want to keep me busy 😉.
Once you have those pieces, get either Raspbian or Ubuntu, flash the image to the microSD, and boot the machine. After that, you have to build and run EndBASIC from unreleased sources until I publish 0.11:
$ cargo install --git=https://github.com/endbasic/endbasic.git --features=rpi
$ ~/.cargo/bin/endbasic --console=st7735s
I know, I know, this is all quite convoluted. You have to manually go through the process of setting up Linux, then installing Rust, and then building EndBASIC from source. All of this is super-slow too.
Which means… what I want to do next is to build a complete “Developer Kit”, including a lightweight prebuilt SD image that gives you access to EndBASIC out of the box in just a few seconds. Right now I’m playing with downsizing a NetBSD/evbarm build so that the machine can boot quickly and, once I have that ready, I’ll have to port EndBASIC’s hardware-specific features to work on it. I don’t think I’ll postpone 0.11 until this is done, but we’ll see.
Interested in any of this? Please leave a note! And if you have tried the above at all with your own hardware, post your story too!

